To remove the noindex tag in WordPress, navigate to Settings > Reading and uncheck the “Discourage search engines” box. Save changes to update your settings.
Optimizing your WordPress site for search engines is crucial for visibility. Noindex tags prevent search engines from indexing specific pages. While useful for private or low-priority content, noindex tags can hinder SEO efforts if applied incorrectly. Removing the noindex tag ensures your valuable content appears in search results, improving traffic and engagement.
WordPress makes this process straightforward through its intuitive settings. By adjusting a few options, you can enhance your site’s search engine performance. Understanding how to manage these settings is essential for any site owner aiming for greater online presence.
Identifying Noindex Tags
Identifying Noindex tags in your WordPress site is crucial for SEO. These tags tell search engines not to index specific pages. Removing them can help your site rank better. Below are two effective methods to identify these tags.
Using Browser Tools
Browser tools can help you find Noindex tags easily. Here’s a simple way to do it:
- Open your website in a browser like Chrome or Firefox.
- Right-click on the page and select Inspect or Inspect Element.
- Go to the Elements tab in the developer tools.
- Press Ctrl + F (or Command + F on Mac) to open the search bar.
- Type to find the tag.
Using Seo Plugins
SEO plugins like Yoast SEO or All in One SEO Pack can also help. They often show Noindex tags in their settings. Here’s how to use them:
- Install and activate your preferred SEO plugin.
- Go to the plugin’s settings page in your WordPress dashboard.
- Look for a section related to Indexing or Meta Tags.
- Check for any pages marked as Noindex.
Using these tools makes it easy to identify and manage Noindex tags.
Using WordPress Settings
Removing the Noindex tag in WordPress can boost your site’s visibility. One way to do this is through WordPress settings. This method is straightforward and doesn’t require coding skills.
Info: How to Speed Up Your WordPress Website: 10 Proven Techniques
Reading Settings Overview
First, go to your WordPress dashboard. Look for Settings in the left-hand menu. Click on Reading. This section controls how your site displays content. Here, you can manage your site’s visibility to search engines.
Adjusting Visibility
In the Reading settings, find the section labeled Search Engine Visibility. You will see a checkbox that says, “Discourage search engines from indexing this site.”
If this box is checked, your site has a Noindex tag. To remove the Noindex tag, simply uncheck this box. This action will allow search engines to index your site.
| Step | Action |
|---|---|
| 1 | Go to Dashboard |
| 2 | Click on Settings |
| 3 | Select Reading |
| 4 | Uncheck “Discourage search engines” |
| 5 | Save Changes |
Info: How to Edit Footer in WordPress: Step-by-Step Guide
After making these changes, click Save Changes at the bottom of the page. Your site will now be visible to search engines. This method is quick and effective for improving your site’s SEO.
Seo Plugin Methods
SEO plugins help manage and optimize your WordPress website. Noindex tags can impact your site’s visibility. Removing these tags is crucial. Below are methods using popular SEO plugins.
Yoast Seo
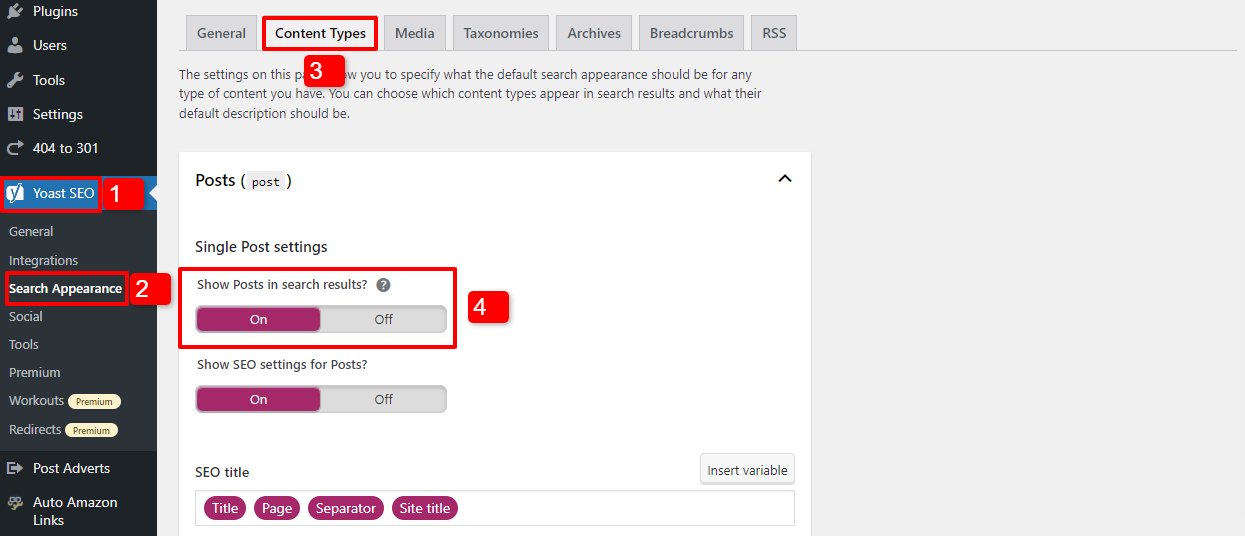
Yoast SEO is a popular WordPress plugin. It offers many features, including the ability to remove the noindex tag.
- Go to your WordPress dashboard.
- Navigate to SEO > Search Appearance.
- Select the Content Types tab.
- Find the content type you want to change.
- Toggle the switch to Show in search results? to “Yes”.
- Click Save Changes.
This method removes the noindex tag for the selected content type.
All In One Seo Pack
The All in One SEO Pack is another powerful plugin. It offers similar features to Yoast SEO.
- Access your WordPress dashboard.
- Go to All in One SEO > Search Appearance.
- Navigate to the Content Types tab.
- Find the specific content type.
- Uncheck the box next to Noindex this content.
- Click Save Changes.
Removing the noindex tag is easy with this plugin.
Using these plugins ensures your content is indexed. It helps improve your site’s visibility and SEO.
Removing Noindex Via Theme Files
The Noindex tag tells search engines not to index a page. Sometimes, this tag can appear in your WordPress theme files. Removing it can improve your site’s SEO. Follow these steps to remove the Noindex tag via theme files.
Accessing Theme Editor
First, access the Theme Editor in WordPress. Go to your WordPress dashboard. Navigate to Appearance > Theme Editor.
A warning message might appear. Be careful while editing theme files. Incorrect changes can break your site.
Info: How to Change a WordPress Font: Step-by-Step Guide
Editing Header.php
In the Theme Editor, find the header.php file. This file usually contains meta tags. Look for the noindex tag within this file.
Here is an example of what you might see:
Remove this line to delete the noindex tag. After editing, click Update File to save changes.
Follow these steps to remove the noindex tag from your WordPress theme files. This can help improve your site’s visibility on search engines.
Testing And Verifying
After removing the noindex tag in WordPress, testing and verifying is crucial. This ensures that your pages are now indexable by search engines. Follow these steps to confirm the changes.
Using Inspect Element
Inspecting the element helps check the source code of your web page. Here’s how to do it:
- Open your web page in a browser.
- Right-click on the page and select Inspect or press Ctrl+Shift+I.
- Go to the Elements tab.
- Search for the tag.
- If it’s not there, the noindex tag is removed.
This process ensures the noindex tag is gone from your page’s HTML.
Using Google Search Console
Google Search Console helps verify if Google can index your pages. Follow these steps:
- Go to Google Search Console.
- Log in to your account.
- Select your property from the dashboard.
- Use the URL Inspection tool.
- Enter the URL of the page you want to check.
- Click on Test Live URL.
If the result shows URL is available to Google, the noindex tag is removed successfully.
By following these methods, you ensure your pages are properly indexed.
Common Issues And Fixes
Removing the Noindex tag in WordPress can be tricky. Common issues can make this task harder. Let’s explore the most frequent problems and how to fix them.
Cache Problems
Cache issues are common when removing the Noindex tag. Cached pages might still show the Noindex tag even after removal.
- Clear your browser cache first.
- Use a caching plugin? Clear its cache too.
- Check if your hosting provider offers caching. Clear that cache as well.
Following these steps ensures you see the latest version of your site. If the tag persists, it might not be a cache problem.
Plugin Conflicts
Plugins can also cause issues with the Noindex tag. Some SEO plugins might add or remove this tag automatically.
- Deactivate all plugins first.
- Reactivate them one by one.
- Check the source code after each activation.
Identify the plugin causing the conflict. Adjust its settings or replace it with a better one. This method is simple and effective for resolving plugin conflicts.
Best Practices
Removing the Noindex Tag in WordPress is crucial for SEO. Adopting best practices ensures your site stays visible to search engines. Follow these steps to maintain a healthy website.
Regular Audits
Conducting regular audits helps identify and fix issues quickly. Use tools like Google Search Console to check for Noindex Tags. Follow these steps:
- Login to Google Search Console.
- Navigate to the ‘Coverage’ section.
- Check for pages with Noindex status.
Ensure all important pages are indexed. Make this a monthly task.
Info: What is Group Block in Gutenberg WordPress: Ultimate Guide
Keeping Plugins Updated
Keeping plugins updated prevents bugs and security issues. Outdated plugins can add Noindex Tags to your pages. Follow these best practices:
- Check for plugin updates weekly.
- Update plugins from the WordPress dashboard.
- Read plugin update notes for changes.
Update plugins to avoid unexpected Noindex Tags. This keeps your site SEO-friendly.


Frequently Asked Questions
How To Find Noindex Tag In WordPress?
Use the “Inspect Element” tool in your browser to check for the noindex tag in your website’s source code.
How To Remove Noindex Tag In WordPress?
Go to your SEO plugin settings and uncheck the noindex option for the pages you want indexed.
Why Is Noindex Tag Used In WordPress?
Noindex tag prevents search engines from indexing specific pages, keeping them out of search results.
Can Plugins Add Noindex Tags Automatically?
Yes, SEO plugins like Yoast or All in One SEO can add noindex tags based on your settings.
Conclusion
Removing the noindex tag in WordPress ensures your site is visible to search engines. Follow the steps carefully to improve your SEO. Regularly check your settings to maintain optimal visibility. By doing this, you enhance your site’s ranking and attract more visitors.
Happy blogging!