To mask a subdomain URL in WordPress, use a plugin like Pretty Links or a custom .htaccess rule. This ensures the subdomain URL appears as a different, more user-friendly URL.
Masking URLs for subdomains in WordPress improves user experience and enhances SEO. Pretty Links plugin offers a simple way to achieve this, allowing you to create clean and memorable URLs. Alternatively, you can edit your. htaccess file for more control.
Both methods help in keeping your website professional and easy to navigate. Proper URL masking also protects sensitive information and maintains brand consistency. This practice is essential for webmasters who aim to optimize their websites effectively. By masking URLs, you ensure visitors have a seamless and secure browsing experience.
Purpose Of Url Masking
Masking a URL for a subdomain in WordPress can be crucial for many reasons. The purpose of URL masking is to hide the actual URL and display a different URL in the browser’s address bar. This technique helps in branding, security, and user experience. By masking URLs, you can make your web addresses more user-friendly and professional.

Benefits Of Url Masking
URL masking offers several benefits that can greatly enhance your website’s performance and user experience:
- Branding: Masked URLs can carry your brand’s name, making them look more professional and consistent.
- Security: Masking can hide the real location of your resources, adding an extra layer of security.
- User Experience: Shorter and more memorable URLs improve user experience and make navigation easier.
- SEO: Clean and relevant URLs can positively affect your search engine rankings, making your site more visible.
Here is a table summarizing these benefits:
| Benefit | Description |
|---|---|
| Branding | Professional and consistent URLs |
| Security | Hides real location of resources |
| User Experience | Short and memorable URLs |
| SEO | Improved search engine rankings |
INFO: Affordable Social Media Management Tools: Boost Your Online Presence
When To Use Url Masking
URL masking is not always necessary but can be very effective in certain scenarios:
- Affiliate Marketing: Masking URLs in affiliate links can make them look cleaner and more trustworthy.
- Custom Domains: If you use a custom domain for your blog or store, masking helps in maintaining a consistent brand image.
- Subdomains: When you have multiple subdomains, masking can make navigation easier and more intuitive.
- Redirects: Masking redirects can help in avoiding confusion and enhancing user experience.
Here are some specific cases:
- Promotional Campaigns: Masked URLs can make your promotional links look cleaner.
- Content Management: Organizing content under masked URLs can make it easier to manage and track.
Setting Up A Subdomain
Masking a URL for a subdomain in WordPress involves setting up a subdomain and configuring DNS settings. This ensures that your website looks professional and functions seamlessly. Setting up a subdomain is the first step in this process.
Creating A Subdomain
Creating a subdomain is straightforward and can be done through your hosting provider’s control panel. Follow these steps to create a subdomain:
- Log into your hosting provider’s control panel.
- Navigate to the ‘Domains’ or ‘Subdomains’ section.
- Click on the option to ‘Create a Subdomain’.
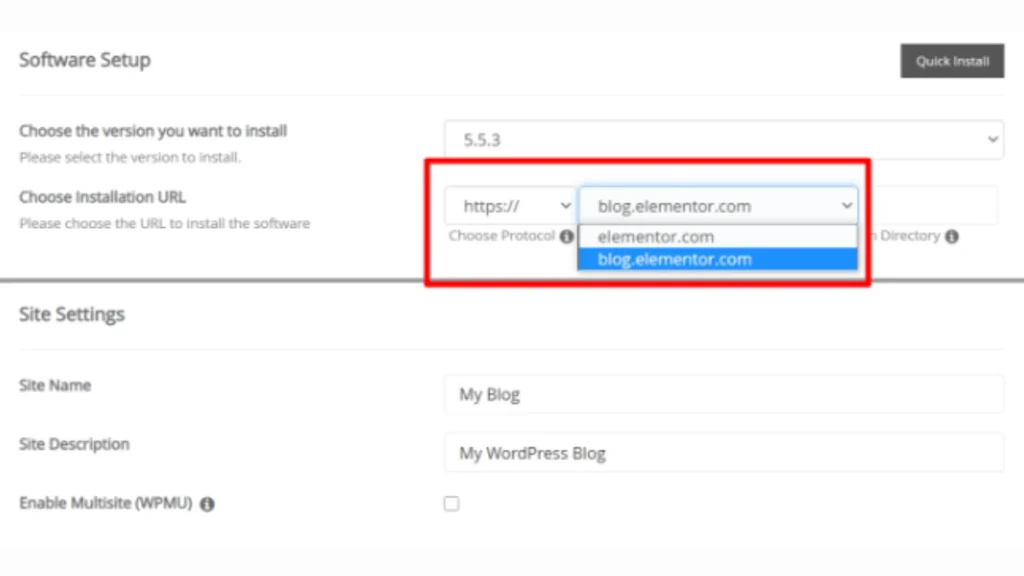
- Enter the name for your subdomain (e.g., blog.yourwebsite.com).
- Select the main domain under which the subdomain will be created.
- Set the document root for the subdomain, which is the directory where the files for the subdomain will be stored.
- Click ‘Create’ or ‘Save’ to complete the process.
Once you’ve created the subdomain, it will appear in your list of domains. You can now upload files or install WordPress on this subdomain. Here’s a quick overview of the details:
| Field | Example |
|---|---|
| Subdomain Name | blog |
| Main Domain | yourwebsite.com |
| Document Root | /public_html/blog |
Creating a subdomain is essential for segmenting your website’s content. It helps in organizing different sections of your site.
Configuring Dns Settings
Configuring DNS settings is crucial to ensure your subdomain points to the correct server. Follow these steps to configure DNS settings:
- Access your DNS management tool through your hosting provider.
- Locate the section for DNS records.
- Add a new A record for your subdomain.
- Enter the name of the subdomain (e.g., blog).
- Point the A record to your server’s IP address.
- Save the changes to update the DNS records.
Below is an example of how your DNS settings might look:
| Record Type | Name | Value |
|---|---|---|
| A | blog | 123.456.789.101 |
It may take some time for the DNS changes to propagate. Once done, your subdomain will be live and pointing to the correct server. Proper DNS configuration is crucial for the smooth functioning of your subdomain.
Choosing A Url Masking Method
Masking URLs for subdomains in WordPress can enhance the user experience and improve your site’s aesthetics. Choosing a URL masking method depends on your technical skills and the specific needs of your website. This section will guide you through two popular approaches: using plugins and the manual code method.
Using Plugins
Plugins offer a user-friendly way to mask URLs without diving into code. They are perfect for those who prefer a simpler and quicker approach.
Here are some benefits of using plugins:
- Easy to install and configure
- No coding skills required
- Support and updates from developers
One popular plugin is Pretty Links. It allows you to create clean URLs and manage them effectively. Follow these steps to use Pretty Links:
- Install and activate the Pretty Links plugin from the WordPress repository.
- Go to the Pretty Links section in your WordPress dashboard.
- Click on “Add New Link”.
- Enter the target URL and the new masked URL.
- Click “Create” to save your new masked URL.
Another excellent plugin is Redirection. This plugin helps manage 301 redirects and track 404 errors. Steps to use Redirection:
| Step | Description |
|---|---|
| 1 | Install and activate the Redirection plugin. |
| 2 | Navigate to the Redirection settings in the dashboard. |
| 3 | Click on “Add New” to create a new redirection. |
| 4 | Enter the source and target URLs. |
| 5 | Save the changes to complete the process. |
INFO: How to Background Color of My Site Header in WordPress: Easy Steps
Manual Code Method
Using manual code to mask URLs provides more control and customization. This method is for those comfortable with editing files and adding custom code.
Here’s how you can mask URLs manually:
- Access your site’s .htaccess file using FTP or a file manager.
- Open the .htaccess file in a text editor.
- Add the following code to create a masked URL:
RewriteEngine On
RewriteCond %{HTTP_HOST} ^subdomain\.yourdomain\.com [NC]
RewriteRule ^(.)$ http://yourdomain.com/subdomain/$1 [L,R=301]
This code redirects the subdomain to a specific directory on your main domain.
For more advanced control, you can use PHP and WordPress hooks. Add the following code to your theme’s functions.php file:
function mask_subdomain_url() {
  if (strpos($_SERVER['HTTP_HOST'], 'subdomain.yourdomain.com') !== false) {
    wp_redirect('http://yourdomain.com/subdomain', 301);
    exit();
  }
}
add_action('template_redirect', 'mask_subdomain_url');
This script checks if the subdomain is accessed and redirects it to the desired URL.
Both methods have their advantages and suit different needs. Choose the one that fits your technical comfort and site requirements best.
Popular Url Masking Plugins
Masking URLs for subdomains in WordPress can help streamline your site’s appearance and improve user experience. Popular URL Masking Plugins make this process simple and efficient. These plugins offer various features that cater to different needs, from basic URL masking to advanced customizations. Let’s explore some of the best plugins available and how to install them.
Plugin Features
Each URL masking plugin comes with unique features designed to cater to your specific needs. Here are some of the most popular plugins and their features:
- Pretty Links: This plugin allows you to create clean, simple URLs on your website that redirect to any other URL. It’s perfect for affiliate links, social media links, and more.
- Redirection: This plugin is a must-have for managing 301 redirects and tracking 404 errors. It helps you to reduce errors and improve your site ranking.
- ThirstyAffiliates: Ideal for affiliate marketers, this plugin lets you cloak your affiliate links and organize them into categories for better management.
Here’s a comparison table of these plugins:
| Plugin | Key Features |
|---|---|
| Pretty Links | Link shortening, tracking, and redirection |
| Redirection | Manage 301 redirects, track 404 errors |
| ThirstyAffiliates | Link cloaking, management, and categorization |
Each of these plugins offers robust features that help you manage and mask URLs effectively, enhancing your site’s functionality and user experience.
Installation Steps
Installing these plugins is straightforward. Follow these steps to get started:
- Log in to your WordPress dashboard.
- Navigate to the Plugins section. Click on ‘Add New’.
- Search for your desired plugin. For example, type ‘Pretty Links’ in the search bar.
- Click ‘Install Now’ next to the plugin. Wait for the installation to complete.
- Click ‘Activate’ to enable the plugin.
After activation, configure the plugin settings:
- For Pretty Links: Go to ‘Pretty Links’ in your dashboard and start creating new links.
- For Redirection: Go to ‘Tools’ > ‘Redirection’ and set up your redirects and track errors.
- For ThirstyAffiliates: Visit ‘ThirstyAffiliates’ in your dashboard to manage and cloak your affiliate links.
Following these steps ensures that the plugins are installed correctly and ready to use. Each plugin’s intuitive interface makes URL masking effortless.
Manual Url Masking Techniques
Masking a URL for a subdomain in WordPress can enhance user experience and improve SEO. While plugins offer easy solutions, manual techniques provide more control. This guide explores manual URL masking techniques to make your subdomain URLs more user-friendly.
Editing .htaccess File
The .htaccess file in WordPress is powerful for URL masking. This file is located in the root directory of your WordPress installation. Editing it allows you to create redirects and rewrite rules.
Follow these steps to edit the .htaccess file:
- Access your WordPress root directory via FTP or cPanel.
- Locate the .htaccess file and create a backup.
- Edit the .htaccess file using a text editor.
Add the following code to the .htaccess file to mask a URL for a subdomain:
RewriteEngine On
RewriteCond %{HTTP_HOST} ^subdomain\.yourdomain\.com$
RewriteRule ^(.)$ /subdirectory/$1 [P]
This code does the following:
- RewriteEngine On: Enables the rewrite engine.
- RewriteCond: Checks if the request is from the subdomain.
- RewriteRule: Redirects the URL to the desired subdirectory.
Save the file and upload it back to the server. This method ensures that your subdomain URL is clean and user-friendly.
Using Php Redirects
PHP redirects offer another way to mask URLs for subdomains. This method involves adding PHP code to your WordPress theme or plugin. PHP redirects are flexible and easy to implement.
To use PHP redirects, follow these steps:
- Open your WordPress theme’s functions.php file.
- Add the following PHP code:
php
function redirect_subdomain() {
  if ($_SERVER['HTTP_HOST'] == 'subdomain.yourdomain.com') {
    header('Location: https://yourdomain.com/subdirectory/');
    exit();
  }
}
add_action('init', 'redirect_subdomain');
?
This code performs the following actions:
- Checks if the request is from the subdomain.
- Redirects to the specified subdirectory.
- Stops further execution with exit().
PHP redirects are efficient and provide a seamless user experience. They are easy to manage and modify as needed.

Testing Url Masking
Masking URLs for subdomains in WordPress can enhance your site’s aesthetics and improve user experience. Testing URL masking is essential to ensure everything works correctly. This step ensures that the masked URL redirects properly and that the SEO impact remains positive.
Checking Redirection
After masking the URL, you must check the redirection. This ensures users land on the correct pages and enjoy a smooth experience. Here are steps to follow:
- Open your browser and enter the masked URL.
- Press Enter and observe the redirection.
- Ensure the content matches the original subdomain.
Using tools can make this easier:
| Tool | Function |
|---|---|
| Redirect Checker | Checks if the URL redirects correctly. |
| Screaming Frog | Scans your site for redirection issues. |
Make sure the redirection is seamless. Users should not notice any change. If issues arise, revisit your URL masking settings. Adjust until the redirection is flawless. This step is crucial for maintaining a professional site appearance.
Verifying Seo Impact
SEO is vital for site visibility. Verifying the SEO impact after masking URLs ensures your site retains its ranking. Here’s how to do it:
- Use Google Analytics to track traffic changes.
- Check Google Search Console for any crawl errors.
- Monitor your keyword rankings using tools like Ahrefs or SEMrush.
Important metrics to monitor include:
| Metric | Importance |
|---|---|
| Organic Traffic | Shows if users can find your site easily. |
| Bounce Rate | Indicates if users are engaging with your content. |
| Indexed Pages | Confirms all pages are searchable. |
INFO: What are Scheduled Actions on WordPress Tools: Boost Efficiency
Ensure that your meta tags and descriptions remain intact. This helps search engines understand your content. Regularly check your SEO tools for updates. Adjust your strategy if needed. Maintaining good SEO practices ensures your site stays visible and attracts more visitors.
Troubleshooting Common Issues
Masking URLs for subdomains in WordPress can enhance your site’s professionalism and user experience. Yet, you might encounter some issues during the process. Troubleshooting these common problems ensures a seamless experience for your visitors. Let’s dive into some frequent hurdles and how to overcome them.
Redirect Loops
Redirect loops are frustrating for both site owners and visitors. They occur when a URL keeps redirecting to another URL, creating an infinite loop. Here are some common causes and solutions:
- Incorrect .htaccess Rules: Ensure your .htaccess file has correct rewrite rules. Misconfigured rules can lead to loops.
- Plugin Conflicts: Disable all plugins and enable them one by one to identify the culprit.
- Mixed Content: Ensure all URLs are either HTTP or HTTPS. Mixed protocols can cause loops.
Here’s a sample .htaccess rule to check:
RewriteEngine On
RewriteCond %{HTTP_HOST} ^subdomain\.yourdomain\.com$ [NC]
RewriteRule ^(.)$ http://yourdomain.com/subdomain/$1 [L,R=301]
If you see a loop, correct any typos or logical errors in your .htaccess file. Always back up your original file before making changes.
Broken Links
Broken links damage user experience and SEO. They occur when linked resources cannot be found. Here’s how to address them:
- Check URLs: Verify all URLs linked from your subdomain. Ensure they point to existing pages or files.
- Use Plugins: Install plugins like Broken Link Checker to identify and fix broken links quickly.
- Update Permalinks: Go to Settings > Permalinks and click “Save Changes.” This refreshes your permalink structure.
Sometimes, broken links stem from outdated content. Regularly update your site content to keep links fresh. A table of common HTTP status codes might help:
| Status Code | Description |
|---|---|
| 200 | OK – The request has succeeded. |
| 404 | Not Found – The server can’t find the requested page. |
| 301 | Moved Permanently – The resource has been permanently moved to a new URL. |
Regularly audit your site for broken links using tools like Google Search Console. This helps maintain a clean, user-friendly site.
Maintaining Url Masking
Masking URLs for subdomains in WordPress enhances the user experience and ensures a clean, professional appearance. Maintaining URL masking is crucial for consistent performance and security. This section will guide you through the steps to maintain URL masking effectively.
Regular Checks
Regular checks are essential for maintaining URL masking. Frequent monitoring helps identify issues quickly. Here’s a simple checklist:
- Verify URL Masking: Ensure the URLs are masked correctly and the subdomain appears as intended.
- Check for Redirects: Verify there are no unwanted redirects that break the URL masking.
- Monitor Performance: Ensure the masked URLs do not affect site performance or load times.
Using tools like Google Analytics can help monitor site performance. Error logs are also helpful in identifying issues. Here’s a simple table to track your checks:
| Check | Frequency | Tool/Method |
|---|---|---|
| Verify URL Masking | Weekly | Manual Check |
| Check for Redirects | Weekly | Redirection Plugin |
| Monitor Performance | Monthly | Google Analytics |
Regular checks ensure that your URL masking is always functional and efficient.
Updating Plugins
Updating plugins is critical for maintaining URL masking. Outdated plugins can lead to vulnerabilities and performance issues. Follow these steps to keep your plugins updated:
- Check for Updates: Regularly check the WordPress dashboard for plugin updates.
- Backup Your Site: Before updating, always backup your site to prevent data loss.
- Update Plugins: Click the update button for each plugin that requires an update.
- Test Your Site: After updating, verify that the URL masking is still functioning properly.
Plugins such as Yoast SEO and All in One SEO Pack are popular for URL masking. Keeping these plugins updated ensures optimal performance. Here’s a quick guide on updating plugins:
| Action | Frequency | Tool/Method |
|---|---|---|
| Check for Updates | Weekly | WordPress Dashboard |
| Backup Your Site | Before Updates | Backup Plugin |
| Update Plugins | Weekly | WordPress Dashboard |
| Test Your Site | After Updates | Manual Check |
INFO: How Does Tradelle Work: Unveiling the Secrets to Success
Regular updates and maintenance ensure your URL masking remains secure and efficient.
Frequently Asked Questions
How To Mask A Subdomain Url?
To mask a subdomain URL in WordPress, use a plugin or modify your. htaccess file.
Can I Use Plugins For Url Masking?
Yes, you can use WordPress plugins like Redirection or Pretty Links to mask subdomain URLs.
What Is .htaccess File In WordPress?
The. htaccess file is a configuration file used by WordPress to control URL redirections and other server settings.
Why Mask Subdomain Urls In WordPress?
Masking subdomain URLs improves user experience, maintains brand consistency, and can enhance website security.
Conclusion
Mastering the art of masking URLs for subdomains in WordPress can improve your site’s professionalism. This skill enhances user experience and boosts SEO. Follow the steps outlined in this guide to achieve seamless URL masking. Enhance your WordPress site today for better navigation and user satisfaction.