To install WordPress, download the latest version from WordPress.org and upload it to your web server. Then, follow the on-screen instructions to complete the installation.
WordPress is a powerful and versatile content management system (CMS) used by millions worldwide. It allows users to create websites and blogs with ease. Its user-friendly interface and extensive plugin library make it an ideal choice for both beginners and experienced developers.
With WordPress, you can customize your site’s appearance, add features, and manage content efficiently. This open-source platform is free to use, and its active community offers continuous support and updates. Whether you want to start a personal blog or a professional business site, WordPress provides the tools you need to succeed online.
Introduction To WordPress
WordPress is a popular platform for creating websites and blogs. It is user-friendly, flexible, and free. You can build any type of site with WordPress. From personal blogs to business websites, WordPress has it all.
Why Choose WordPress
There are many reasons to choose WordPress for your site. Here are some key points:
- Easy to Use: WordPress is simple and intuitive.
- Customizable: Many themes and plugins to choose from.
- SEO Friendly: Built-in tools to help with search engine optimization.
- Community Support: Large community for help and advice.
Features And Benefits
WordPress offers many features that make it a great choice:
| Feature | Benefit |
| Custom Themes | Design your site as you like. |
| Plugins | Add functionality with ease. |
| Responsive Design | Looks great on all devices. |
| Security | Keep your site safe and secure. |
- Step One: Download WordPress from the official site.
- Step Two: Upload files to your web server.
- Step Three: Create a database for WordPress.
- Step Four: Run the WordPress installation script.
These steps will help you install WordPress quickly. Follow each step carefully for a successful installation.
Preparing For Installation
Before you start installing WordPress, you need to prepare. This preparation helps you set up a strong foundation. Let’s break down the steps.
Choosing A Domain Name
Your domain name is your website’s address on the web. It should be easy to remember. Choose a name that reflects your brand or purpose. Avoid using numbers and hyphens. You can use tools like Hostinger or Namecheap to find available names. Make sure the domain is short and catchy.
Selecting A Web Host
A web host stores your website files and makes them accessible online. Look for a host with good uptime and speed. Popular options include Bluehost, Hostinger, and HostGator. Check if they offer WordPress-specific plans. These plans often come with easy installation options.
Here is a comparison table to help you decide:
| Web Host | Uptime | Speed | WordPress Plans |
| Bluehost | 99.99% | Fast | Yes |
| Hostinger | 99.98% | Fast | Yes |
| HostGator | 99.97% | Fast | Yes |
Info: How to Start a Shopify Store: Ultimate Beginner’s Guide
After selecting your web host, sign up for a plan. Most hosts offer a one-click WordPress installation. Follow their instructions to set up your account. Make sure to keep your login details safe.
Setting Up Your Web Host
Before you install WordPress, you need a reliable web host. The web host provides the server space for your website. Follow these steps to set up your web host for WordPress.
Accessing The Control Panel
First, log in to your web hosting account. Look for the Control Panel or cPanel link. Click on it to access the control panel.
In the control panel, you will find many options. Focus on the sections related to databases and file management.
Creating A Database
WordPress needs a database to store all your site data. To create a database, follow these simple steps:
- Find the Database section in your control panel.
- Click on MySQL Databases.
- Enter a name for your new database and click Create Database.
Next, create a user for your database:
- In the same MySQL Databases section, scroll down to MySQL Users.
- Enter a username and password for the new user.
- Click Create User.
Finally, assign the user to the database:
- In the MySQL Databases section, find Add User to Database.
- Select the user and the database you just created.
- Click Add and grant all privileges to the user.
Downloading WordPress
Downloading WordPress is the first step in setting up your new website. This guide will help you download the latest version of WordPress quickly and efficiently. Follow these steps to get started.
Getting The WordPress Package
First, you need the WordPress package. Go to the WordPress download page. Click the big blue button labeled “Download WordPress”. Your download will start automatically.
Unpacking The Files
Once the download is complete, locate the file on your computer. It’s usually in your Downloads folder. The file will be in a .zip format.
Right-click the .zip file and select “Extract All”. Choose a destination for the unpacked files. Click “Extract” to begin unpacking.
After extraction, you will have a folder named “wordpress”. This folder contains all the files you need to install WordPress.
| Step | Action |
| 1 | Visit the WordPress download page |
| 2 | Click “Download WordPress” |
| 3 | Locate the .zip file |
| 4 | Right-click and select “Extract All” |
| 5 | Choose a destination and click “Extract” |
Now you have the WordPress files ready for installation. You can proceed to the next steps to set up your website. Stay tuned for our next section on creating a database and configuring WordPress.
Uploading WordPress To Server
Uploading WordPress to your server is a critical step. This process ensures your website files are in place. Let’s break it down into simple steps.
Using Ftp Client
First, you need an FTP client like FileZilla or Cyberduck. These tools help transfer files from your computer to the server. Follow these steps:
- Download and install an FTP client.
- Open the FTP client and connect to your server.
- Enter your FTP username and password.
Placing Files In The Root Directory
After connecting to the server, locate the root directory. This is often named public_html or www. Follow these steps:
- Download the latest WordPress package from the official site.
- Unzip the downloaded file on your computer.
- Upload all the unzipped files to the root directory.
Ensure all files are in the right place. This makes your WordPress site functional. Here’s a quick overview:
| Step | Action |
| 1 | Download WordPress |
| 2 | Unzip the package |
| 3 | Upload to root directory |
Once uploaded, you’re ready to run the WordPress installation script. Simply go to your domain in a web browser to start the installation process. Happy blogging!
Configuring WordPress
After installing WordPress, the next important step is configuring it. Proper configuration ensures your site runs smoothly. This process involves editing key files and entering database information.
Editing The Wp-config.php File
The wp-config.php file is crucial for your WordPress site. This file contains your database connection details and other vital settings.
To edit this file, follow these steps:
- Locate the wp-config-sample.php file in your WordPress directory.
- Rename it to wp-config.php.
- Open the file in a text editor.
- Find the section that starts with / MySQL settings – You can get this info from your web host /.
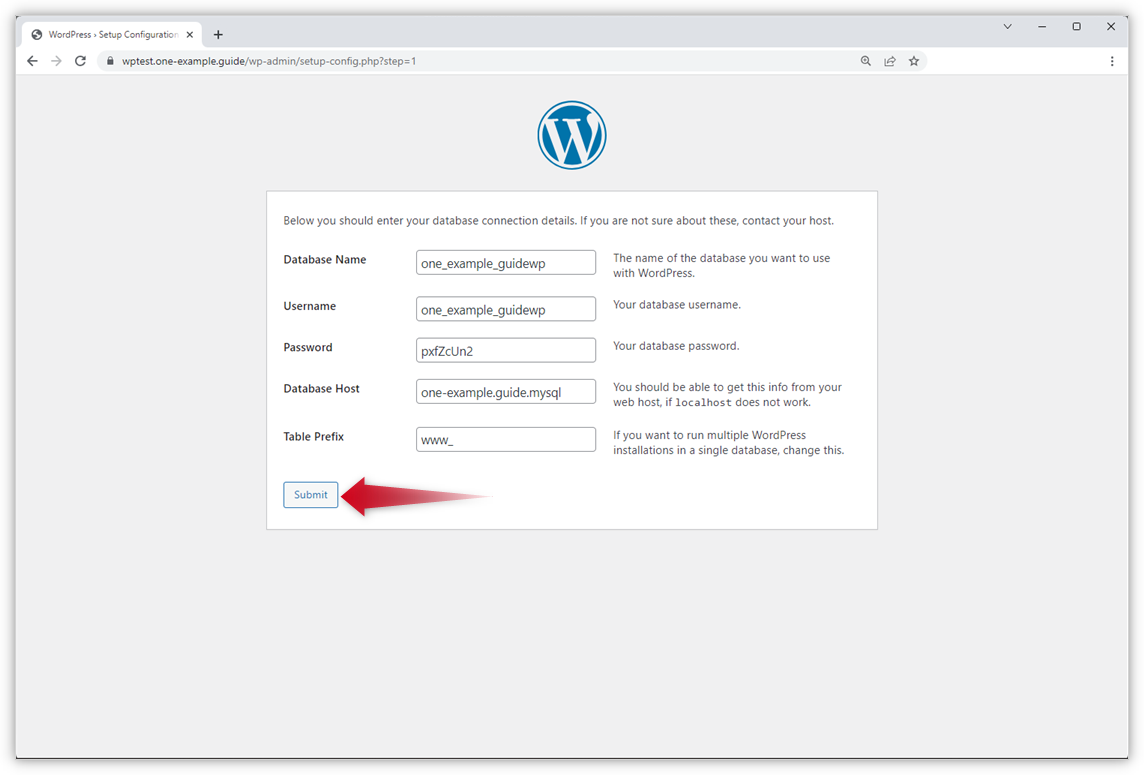
Entering Database Information
Now, you need to enter your database information. This information connects WordPress to your database.
Here’s a table of the key settings you need to update:
| Setting | Description | Example Value |
| DB_NAME | Your database name | my_database |
| DB_USER | Your database username | my_username |
| DB_PASSWORD | Your database password | my_password |
| DB_HOST | Your database host | localhost |
Update the values in the wp-config.php file:
define(‘DB_NAME’, ‘my_database’);
define(‘DB_USER’, ‘my_username’);
define(‘DB_PASSWORD’, ‘my_password’);
define(‘DB_HOST’, ‘localhost’);
Save and close the file. Your WordPress site is now configured!
Running The Installation Script
Running the installation script is a crucial step in setting up WordPress. This script configures your site and connects it to your database. Follow these simple steps to successfully run the installation script.
Accessing The Installer
Open your browser and enter your website’s URL. Add /wp-admin/install.php to the end of the URL. Hit enter to access the WordPress installer.
You will see a welcome screen. This screen will prompt you to select your language. Choose your preferred language and click Continue.
Completing The Setup
You will now see the setup page. Here, you need to fill in some information:
- Site Title: Enter a name for your website.
- Username: Create a username for your admin account.
- Password: Choose a strong password. The installer will show the password strength.
- Your Email: Enter your email address.
- Search Engine Visibility: If you don’t want search engines to index your site, check this option.
After filling out all fields, click the Install WordPress button. WordPress will now install your site.
Once the installation is complete, you will see a success message. Click the Log In button to access the admin dashboard. Use the username and password you created earlier.
Congratulations! You have successfully installed WordPress.
Post-installation Steps
After installing WordPress, some essential tasks ensure your website runs smoothly. These steps help you customize, secure, and optimize your site for the best performance.
Choosing A Theme
Your website’s theme determines its look and feel. Selecting the right theme is crucial. Follow these steps to choose a theme:
- Go to your WordPress dashboard.
- Navigate to Appearance > Themes.
- Click Add New to browse available themes.
- Use the search bar or filters to find a theme you like.
- Click Install on the theme you want.
- After installation, click Activate to apply the theme to your site.
Installing Essential Plugins
Plugins add extra features to your WordPress site. Here are the steps to install essential plugins:
- In your WordPress dashboard, go to Plugins > Add New.
- Use the search bar to find the plugins you need.
- Click Install Now next to the plugin you want.
- After installation, click Activate to enable the plugin.
Here are some essential plugins to consider:
- Yoast SEO – Helps optimize your site for search engines.
- Akismet – Protects your site from spam comments.
- WP Super Cache – Improves site speed by caching pages.
- Contact Form 7 – Creates contact forms for your site.
Following these steps ensures your WordPress site is ready for visitors. Customize your theme and install essential plugins to enhance functionality and appearance.
Securing Your WordPress Site
Securing your WordPress site is vital. This protects your data and visitors. A secure website builds trust and ensures smooth operation. Below are key steps to enhance your WordPress security.
Updating Regularly
Always keep your WordPress site updated. Updates fix security issues and add new features. Follow these steps to update WordPress:
- Log in to your WordPress dashboard.
- Navigate to Dashboard > Updates.
- Click Update Now if an update is available.
Also, update plugins and themes. Outdated plugins can be security risks. Keep everything current to ensure maximum protection.
Using Security Plugins
Security plugins add extra layers of protection. They help detect and block threats. Here are some recommended security plugins:
| Plugin Name | Features |
| Wordfence | Firewall, malware scan, login security |
| Sucuri | Malware cleanup, firewall, monitoring |
| iThemes Security | Brute force protection, file change detection |
Info: How to Make Shopify Store Look Professional: Expert Tips
Install a plugin from the WordPress plugin repository:
- Go to Plugins > Add New.
- Search for your preferred security plugin.
- Click Install Now, then Activate.
Configure the settings of your security plugin. Follow the instructions provided by the plugin.
Frequently Asked Questions
How Do I Install WordPress?
Download WordPress from wordpress. org, upload it to your server, and run the installation script.
What Are The WordPress Installation Requirements?
You need a domain name, web hosting, PHP version 7. 4 or greater, and MySQL version 5. 6 or greater.
Can I Install WordPress On My Computer?
Yes, you can use software like XAMPP or WAMP to create a local server environment.
How Do I Troubleshoot WordPress Installation Issues?
Check your server requirements, ensure database details are correct, and review error logs for specific issues.
Conclusion
Setting up WordPress is easier than you think. Follow these steps, and your website will be live soon. Remember to customize your site to reflect your brand. Keep your WordPress and plugins updated for security. Now, start sharing your content with the world and enjoy your online presence!