To import full site into Hostinger, use their hPanel to upload your website files and database. Follow the provided steps to ensure a smooth transition.
Hostinger offers a user-friendly platform for website hosting. Importing your entire website into Hostinger can seem daunting, but it’s straightforward with the right steps. Start by backing up your existing website files and database. Next, log into your Hostinger account and access the hPanel.
Use the File Manager or FTP to upload your website files. Then, import your database through the MySQL Databases section. Ensure all configurations match your previous settings. Finally, update your domain’s DNS settings to point to Hostinger’s servers. Following these steps ensures a seamless migration, minimizing downtime and maintaining your website’s functionality.
Preparing For Import
Importing a full site into Hostinger can seem like a daunting task, but with the right preparation, it can be a smooth process. Proper preparation ensures that your website data remains intact and functional during and after the transfer. Let’s break down the essential steps you need to take to prepare for importing your full site into Hostinger.
Backup Your Current Site
Before making any changes, it’s crucial to backup your current site. This will safeguard your data in case anything goes wrong during the transfer process. Here are some steps to help you backup your site:
- Manual Backup: Access your site’s files via FTP and download them to your local machine. Don’t forget to export your database.
- Using Plugins: For WordPress users, plugins like UpdraftPlus, BackupBuddy, or Duplicator can simplify the backup process.
- Hosting Provider Backup: Many hosting providers offer built-in backup solutions. Check your current host’s control panel for a backup option.
Here’s a quick comparison of backup methods:
| Method | Pros | Cons |
|---|---|---|
| Manual Backup | Complete control, no extra cost | Time-consuming, technical knowledge required |
| Plugins | Easy to use, automated | May require premium purchase for full features |
| Hosting Provider | Convenient, often included in hosting package | Limited features, potential additional cost |
INFO: How to Use Semrush: Ultimate Guide for SEO Success
Once you’ve backed up your site, store the backup files in a safe location. This ensures you can restore your site if needed.
Check Hostinger Requirements
Before proceeding with the import, ensure your site is compatible with Hostinger’s hosting environment. Checking Hostinger’s requirements is essential to avoid any issues during the migration. Here are some key points to review:
- Supported CMS: Hostinger supports popular CMS platforms like WordPress, Joomla, and Drupal. Verify that your site’s CMS is supported.
- PHP Version: Ensure your site’s PHP version is compatible with Hostinger’s available versions. This information can typically be found in your site’s control panel or by contacting your current hosting provider.
- Database Type: Hostinger supports MySQL and MariaDB databases. Verify that your site’s database type is compatible.
Here’s a summary of Hostinger’s key requirements:
| Requirement | Details |
|---|---|
| Supported CMS | WordPress, Joomla, Drupal |
| PHP Version | 7.4, 8.0, 8.1 |
| Database Type | MySQL, MariaDB |
By ensuring compatibility with Hostinger’s requirements, you can avoid potential issues and ensure a smooth transfer. Double-check these requirements before initiating the import process.
Exporting Your Site
Importing your full site into Hostinger can seem daunting, but it doesn’t have to be. One of the first steps is exporting your site from its current location. This process can be done through various methods, and ensuring you do it correctly is crucial for a seamless transition. Below, we will explore two primary methods: using cPanel Export and utilizing FTP for files.
Using Cpanel Export
cPanel is a popular web hosting control panel that simplifies website management. Exporting your site using cPanel is straightforward and efficient. Here’s a step-by-step guide:
- Login to cPanel: Use your username and password to access your cPanel dashboard.
- Navigate to Backup: Find the ‘Backup’ option under the ‘Files’ section.
- Download a Full Backup: Click on ‘Download a Full Website Backup’. This will save a complete version of your site, including all files and databases.
- Select Backup Destination: Choose where you want to save the backup. You can save it locally or to a remote destination.
- Generate Backup: Click ‘Generate Backup’ and wait for the process to complete. You will receive a notification once the backup is ready for download.
These steps will ensure you have a complete copy of your site. This method is excellent for beginners due to its simplicity.
Utilizing Ftp For Files
FTP (File Transfer Protocol) is another reliable method for exporting your site. This method involves transferring files directly from your server to your local machine. Follow these steps:
- Download an FTP Client: Use a client like FileZilla. It’s free and user-friendly.
- Connect to Your Server: Open FileZilla and enter your FTP credentials (host, username, password, port).
- Navigate to Your Root Directory: Locate the root directory of your website. It’s usually named ‘public_html’ or ‘www’.
- Select and Download Files: Select all the files and directories you need. Right-click and choose ‘Download’ to transfer them to your local machine.
- Export Databases: For database files, use phpMyAdmin. Export the database by selecting it and clicking ‘Export’. Save the file locally.
Using FTP gives you more control over the files you transfer. It’s beneficial for users familiar with file management and server operations.
Setting Up Hostinger
Importing a full site into Hostinger can seem daunting. However, by following a few simple steps, you can have your website up and running in no time. The first step in this process is setting up Hostinger. This involves creating a new account and choosing the right plan. Each of these steps is crucial for ensuring a smooth website import.
Creating A New Account
To get started, you need to create a new account on Hostinger. This process is straightforward and only takes a few minutes. Follow these steps:
- Visit the Hostinger website.
- Click on the Sign Up button.
- Enter your email address and create a password.
- Click Create Account.
After creating your account, you will receive a confirmation email. Click the link in this email to verify your account. Once verified, you can log in to your new Hostinger account.
If you encounter any issues during this process, Hostinger offers excellent customer support. You can reach out to them via live chat or email for assistance.
INFO: Which is Better Ahrefs Vs Semrush: Ultimate SEO Tool Showdown
Choosing The Right Plan
Choosing the right plan is crucial for your website’s performance. Hostinger offers several plans to suit different needs. Here’s a breakdown:
| Plan | Price | Features |
|---|---|---|
| Single Shared Hosting | $1.99/month | 1 Website, 30 GB SSD Storage, 100 GB Bandwidth |
| Premium Shared Hosting | $2.99/month | Unlimited Websites, 100 GB SSD Storage, Unlimited Bandwidth |
| Business Shared Hosting | $4.99/month | Unlimited Websites, 200 GB SSD Storage, Unlimited Bandwidth |
If you’re just starting, the Single Shared Hosting plan might be enough. For more resources and features, consider the Premium or Business plans.
Once you’ve chosen a plan, click Select and proceed to payment. After completing the payment, your plan will be activated immediately.
Choosing the right plan ensures that your website runs smoothly and efficiently. Take your time to evaluate your needs before making a decision.
Importing Files To Hostinger
Importing a full site into Hostinger is a crucial step for many website owners. Whether you’re migrating from another host or starting fresh, understanding how to import your files efficiently ensures your site runs smoothly. Importing files to Hostinger can be done in a few ways, but the two most popular methods are using the File Manager and uploading via FTP. Let’s dive into these methods to make your site migration seamless.
Using File Manager
Hostinger’s File Manager is a user-friendly tool that simplifies file uploads. It’s perfect for beginners who might not be familiar with FTP. Here’s how to use it:
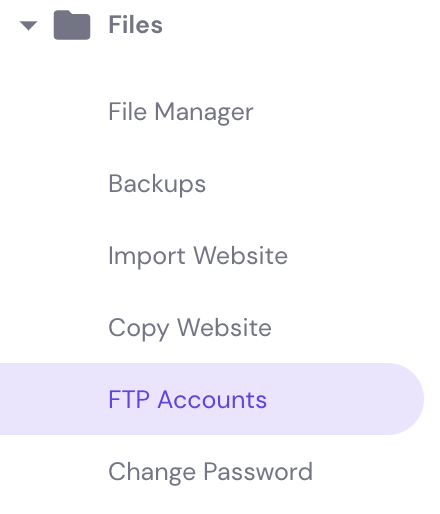
- Log in to your Hostinger account and navigate to the hPanel.
- Click on File Manager under the Files section.
- Navigate to the public_html directory. This is where your website files should reside.
- Click on the Upload Files button at the top.
- Select the files or archive (like a .zip file) you want to upload.
- Once uploaded, extract the archive if necessary by right-clicking and selecting Extract.
Using the File Manager is straightforward. Here’s a quick comparison of its pros and cons:
| Pros | Cons |
|---|---|
| Easy to use | Limited to smaller file sizes |
| Accessible via browser | Not ideal for bulk uploads |
In summary, the File Manager is ideal for quick, small-scale uploads. For larger sites, consider using FTP.
Uploading Via Ftp
FTP (File Transfer Protocol) is a robust method for uploading multiple or large files. It requires an FTP client like FileZilla. Here’s how to use FTP:
- Download and install FileZilla or another FTP client.
- Open FileZilla and enter your Hostinger FTP credentials. These are found in your hPanel under FTP Accounts.
- Click Quickconnect to connect to your server.
- In the FileZilla interface, locate your local files on the left side.
- Navigate to the public_html directory on the right side.
- Drag and drop your files from the left to the right to upload them.
FTP is powerful but requires a bit more setup. Here’s a comparison of its pros and cons:
| Pros | Cons |
|---|---|
| Handles large files | Requires FTP client installation |
| Supports bulk uploads | More complex for beginners |
For large site migrations, FTP is the preferred method. It ensures all files are uploaded efficiently.
Configuring Database
Importing your full site into Hostinger is a straightforward process. One crucial step is configuring the database. Proper database configuration ensures your website functions smoothly. Let’s explore how to create a new database and import SQL files.
Creating A New Database
Creating a new database is essential for your website’s data storage. Follow these steps to set up a new database in Hostinger:
- Log in to your Hostinger account.
- Navigate to the hPanel.
- Select Databases from the menu.
- Click on MySQL Databases.
- Enter a name for your new database.
- Create a username and password for the database.
- Click on Create to finalize.
Here’s a quick overview of the fields you need to fill:
| Field | Description |
|---|---|
| Database Name | Choose a unique name for your database. |
| Username | Create a username for database access. |
| Password | Set a strong password for security. |
After creating the database, note down the database name, username, and password. These details are crucial for the next steps.
Importing Sql Files
Importing SQL files transfers your data into the new database. Follow these steps to import SQL files:
- Access the hPanel and go to phpMyAdmin.
- Select the database you created earlier.
- Click on the Import tab at the top.
- Click Choose File and select the SQL file from your computer.
- Ensure the format is set to SQL.
- Click on Go to start the import.
Here’s a summary of the import settings:
| Setting | Description |
|---|---|
| File to import | Choose the SQL file from your local storage. |
| Format | Set to SQL. |
| Partial import | Optional, for large files. |
After clicking Go, phpMyAdmin will upload and execute the SQL commands. This process transfers your website data into the new database.
Check for any errors during the import process. If any errors occur, review the SQL file and correct any issues.
Updating Site Settings
Importing your full site into Hostinger is a crucial task for ensuring smooth website functionality. One of the key steps in this process is Updating Site Settings. This ensures that your website runs efficiently in its new environment. Below, we break down the essential steps to update your site settings effectively.
Adjusting Config Files
Config files are the backbone of your website’s settings. These files store important information such as database connections, site URLs, and other configurations. To adjust these files, follow these steps:
- Access your hosting account: Log into your Hostinger account and navigate to the file manager.
- Locate the config file: Find the
wp-config.phpfile if you are using WordPress. For other platforms, locate their respective config files. - Update database settings: Open the config file and update the database name, username, password, and host information.
- Change site URLs: Ensure the site URL and home URL are set to your new domain in the config file.
Here’s an example of a wp-config.php file configuration:
define('DB_NAME', 'your_database_name');
define('DB_USER', 'your_database_user');
define('DB_PASSWORD', 'your_database_password');
define('DB_HOST', 'localhost');
define('WP_HOME', 'http://yourdomain.com');
define('WP_SITEURL', 'http://yourdomain.com');
Make sure to save the changes and close the file. Incorrect settings can lead to database connection errors, so double-check your entries.
Modifying Domain Settings
Modifying domain settings ensures that your domain points correctly to your new Hostinger server. This involves updating DNS settings and ensuring your domain is properly configured in your hosting account. Follow these steps:
- Update DNS records: Log into your domain registrar and navigate to the DNS settings. Update the A record to point to your Hostinger server’s IP address.
- Modify nameservers: Change the nameservers to Hostinger’s nameservers, which are typically
ns1.dns-parking.comandns2.dns-parking.com. - Verify domain settings: Ensure that your domain is added to your Hostinger account. Go to the Domains section and add your domain if it’s not listed.
Here’s a table summarizing the necessary DNS settings:
| Record Type | Host | Points to |
|---|---|---|
| A | @ | Your Hostinger IP |
| CNAME | www | Your domain |
After updating the DNS settings, propagation can take up to 48 hours. Verify the changes by visiting your domain and ensuring it redirects to your Hostinger server.
Testing The Site
After importing your full site into Hostinger, the next crucial step is testing the site. This ensures everything works smoothly and visitors have a seamless experience. This section will guide you through checking links and functionality and ensuring compatibility.
Checking Links And Functionality
First, inspect all your site’s links to ensure they work properly. Broken links can frustrate users and hurt your SEO.
- Internal Links: Verify that links pointing to other pages on your site direct users to the correct locations.
- External Links: Check that links to external sites open the intended pages. If any external links are broken, update or remove them.
- Navigation Menu: Ensure that the main menu and any sub-menus operate as expected.
Next, review the functionality of interactive elements:
- Forms: Test contact forms, sign-up forms, and any other forms on your site. Make sure submissions are successful and received.
- Buttons: Verify that all buttons perform their intended actions, such as redirecting users or submitting information.
- Media Elements: Ensure images, videos, and other media load correctly and are displayed properly.
Using a checklist can help:
| Element | Status |
|---|---|
| Internal Links | Checked |
| External Links | Checked |
| Forms | Checked |
| Buttons | Checked |
| Media Elements | Checked |
INFO: How to Remove Noindex Tag in WordPress: Step-by-Step Guide
Ensuring Compatibility
Compatibility is key to providing a consistent experience across different devices and browsers. Start by testing your site on various web browsers:
- Google Chrome
- Mozilla Firefox
- Safari
- Microsoft Edge
Ensure the site loads correctly and functions as expected on each browser. Next, test on different devices:
- Desktops/Laptops: Check on both Windows and macOS systems.
- Tablets: Ensure the site is responsive and looks good on tablets.
- Smartphones: Verify that the mobile version of your site works smoothly.
Consider using tools like BrowserStack or CrossBrowserTesting for comprehensive testing. These tools allow you to test your site on multiple browsers and devices without needing physical access to them.
Lastly, check the site’s loading speed. Tools like Google PageSpeed Insights can help you analyze and optimize your site’s performance. A fast-loading site improves user experience and boosts SEO.
- PageSpeed Insights Score: Aim for a score above 90.
- Image Optimization: Compress images to reduce load times.
- Minify CSS/JS: Minify your CSS and JavaScript files for faster loading.
By ensuring compatibility, you provide a seamless and enjoyable experience for all users, regardless of their device or browser choice.
Troubleshooting Common Issues
Importing a full site into Hostinger is a straightforward process. Yet, sometimes users face common issues that need troubleshooting. Here, we will focus on two frequent problems: 404 errors and database connection issues. We will explore how to resolve them efficiently.
Resolving 404 Errors
404 errors occur when your web server cannot find the requested page. This issue often arises due to incorrect links, missing files, or misconfigured settings.
Follow these steps to troubleshoot and resolve 404 errors:
- Check URLs: Ensure all links are correct. Typos can lead to 404 errors.
- Verify File Paths: Make sure the files are in the correct directory.
- Update Permalinks: Go to your WordPress dashboard, navigate to Settings > Permalinks, and click ‘Save Changes’ to refresh permalink structure.
If the issue persists, consider these additional tips:
- Check .htaccess File: Ensure your .htaccess file is configured properly. A misconfigured .htaccess can cause 404 errors. Here is a default WordPress .htaccess file:
# BEGIN WordPress

RewriteEngine On
RewriteBase /
RewriteRule ^index\.php$ - [L]
RewriteCond %{REQUEST_FILENAME} !-f
RewriteCond %{REQUEST_FILENAME} !-d
RewriteRule . /index.php [L]

# END WordPress
Ensure this code is present in your .htaccess file. If missing, add it and save the file.
If you’re still experiencing 404 errors, contact Hostinger support for further assistance.
Fixing Database Connection Problems
Database connection problems occur when WordPress cannot connect to your database server. This issue can be due to incorrect database credentials or server issues.
Follow these steps to troubleshoot and resolve database connection problems:
- Check Database Credentials: Ensure your database name, username, password, and host are correct in the wp-config.php file.
- Test Connection: Use a simple PHP script to test the database connection. Create a file named testdb.php and add the following code:
php
$servername = "localhost";
$username = "your_username";
$password = "your_password";
$dbname = "your_database";

$conn = new mysqli($servername, $username, $password, $dbname);

if ($conn-connect_error) {
    die("Connection failed: " . $conn->connect_error);
}
echo "Connected successfully";
$conn->close();
?>
Upload this file to your server and access it via your browser. If it says “Connected successfully,” your credentials are correct.
If the problem persists, consider these additional tips:
- Restart MySQL Server: Sometimes, restarting the MySQL server can resolve connection issues.
- Check Database Server Status: Ensure your database server is running and accessible. Hostinger’s control panel can provide this information.
If you’re still facing database connection problems, contact Hostinger support for further assistance.
Frequently Asked Questions
What Is Hostinger Site Import?
Hostinger site import is a process to move your entire website to Hostinger. This includes files, databases, and configurations.
How Do I Start Importing A Site?
To start, log in to your Hostinger account. Go to the “Import Website” section and follow the prompts.
Can I Import A WordPress Site?
Yes, you can import a WordPress site to Hostinger. Use the “Auto-Installer” tool for a hassle-free process.
What Files Do I Need For Import?
You need your website files and a database backup. Ensure all files are up-to-date for a smooth import.
Conclusion
Migrating your website to Hostinger is straightforward with the right steps. Follow the guide to ensure a seamless transition. Enjoy the benefits of faster loading times and better support. Hostinger offers user-friendly tools to make the process effortless. Happy hosting and best of luck with your new website home!