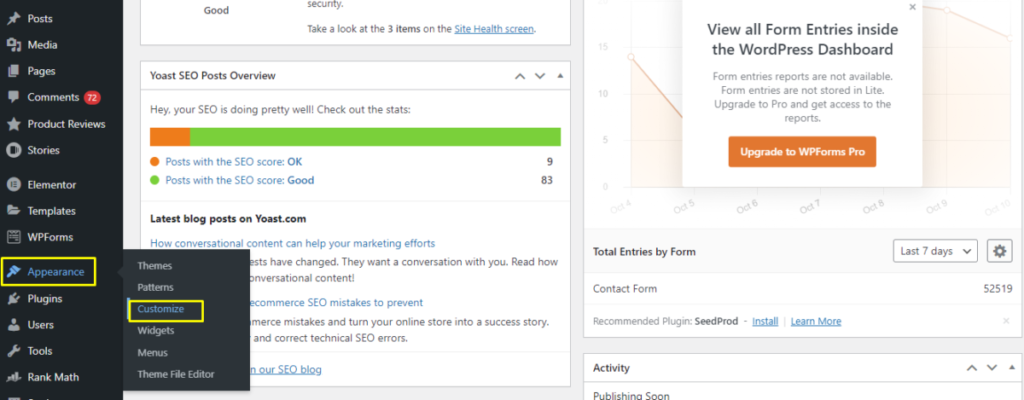
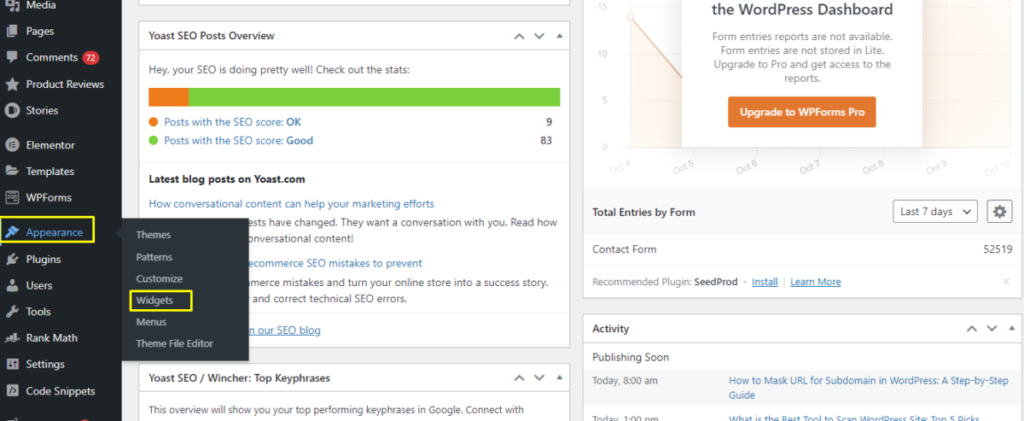
To edit the footer on WordPress, navigate to Appearance, then select Widgets or Customize. Modify the footer widget or use the theme customizer.
Editing the footer on your WordPress site can enhance user experience and improve SEO. The footer often contains essential information like contact details, social media links, and copyright notices. Customizing it helps in branding and ensures visitors find relevant information easily.
Navigate to Appearance in your WordPress dashboard to access Widgets or Customize options. Depending on your theme, you may have various widget areas to modify. You can add, remove, or edit content to suit your needs. A well-designed footer contributes to better site navigation and overall aesthetics, making your website more professional and user-friendly.
Accessing The Footer
Editing the footer on WordPress can seem daunting, but it’s quite simple once you know the steps. The footer is the section at the bottom of your website and can contain important information like contact details, copyright notices, and social media links. This guide will walk you through accessing the footer to make your changes. Let’s dive in!
Using WordPress Dashboard
The WordPress Dashboard is your command center. Here’s how you can access and edit your footer:
- Log in to your WordPress admin area.
- Once logged in, you will see the Dashboard.
- On the left-hand menu, find Appearance and click on it.
- Under Appearance, select Widgets.
In the Widgets section, you can add, remove, or edit widgets that appear in your footer:
| Action | Steps |
|---|---|
| Add a widget | Drag and drop a widget into the footer widget area. |
| Remove a widget | Drag the widget out of the footer widget area. |
| Edit a widget | Click on the widget to make changes. |
INFO: How to View HTML Code of WordPress Theme Saasland: Expert Guide
Using the Dashboard is an easy way to manage your footer content without touching any code. This method is particularly useful for beginners.
Navigating To Theme Editor
For more advanced customizations, you might need to use the Theme Editor:
- Go to Appearance on the left-hand menu.
- Select Theme Editor from the dropdown.
- A warning message may appear. Click I understand to proceed.
In the Theme Editor, you can directly edit the footer.php file:
- Find the footer.php file in the list on the right-hand side.
- Click on footer.php to open it.
- Make your changes in the code editor.
Here is a basic example of what the footer.php file might look like:
© 2023 Your Website NameContact us at: info@yourwebsite.comAfter making your changes, click the Update File button to save. Editing the footer using the Theme Editor provides more flexibility but requires a basic understanding of HTML and PHP.

Identifying Footer File
Editing the footer on WordPress can transform your site’s look and feel. To make these changes, you need to identify the correct footer file. This involves locating and understanding the footer.php file, which houses the footer content. Understanding this file’s structure will help you make precise edits, ensuring your website’s footer aligns with your brand.
Locating Footer.php
The footer.php file is the core file for your WordPress footer. You can find it in the theme directory. Follow these steps to locate it:
- Login to your WordPress dashboard.
- Navigate to Appearance > Theme Editor.
- On the right-hand side, find and click on footer.php.
Here is an example of the path:
| Step | Path |
|---|---|
| 1 | wp-content/themes/your-theme/footer.php |
Ensure you backup your website before making any changes. This prevents data loss if something goes wrong.
Understanding Footer Structure
The footer.php file consists of HTML, CSS, and PHP code. This code dictates the footer’s appearance and functionality. Understanding this structure is crucial for effective editing.
Key elements to note:
- HTML: Structures the footer content, such as text, images, and links.
- CSS: Styles the footer, defining colors, fonts, and layout.
- PHP: Adds dynamic elements, like widgets and menus.
Here’s a simple example of a footer structure:
php dynamic_sidebar( 'footer-1' ); ?
© 2023 Your Website
This code includes a widget area and a copyright notice. You can modify the text and add more HTML to customize your footer.
Editing Footer Content
Editing the footer on WordPress can make your website more professional and useful. The footer is the bottom part of your site, often filled with important links, texts, and social media icons. This guide will help you edit the footer content, making your site stand out.
Adding Text And Links
Adding text and links to your WordPress footer is simple. First, go to your WordPress dashboard. Navigate to Appearance and then click on Widgets. Here, you will see various widget areas, including the footer widget area.
Select a Text Widget from the list. Drag and drop it into the footer widget area. You can now add text and links to this widget. Use the HTML editor for more control over your content.
- Type your text in the editor.
- To add links, use the HTML tag.
- For example:
Example Link. - Click Save to apply changes.
Here is a sample of how your text and links might look:
| Text | Link |
|---|---|
| Contact Us | Contact |
| Privacy Policy | Privacy Policy |
Inserting Social Media Icons
To make your site more engaging, add social media icons to your footer. This lets visitors connect with you on different platforms. Go to your WordPress dashboard and navigate to Appearance > Widgets.
Choose a Custom HTML Widget and drag it into the footer widget area. You can now add social media icons using HTML and Font Awesome icons. Here is how:
- Include the Font Awesome CDN in your site’s section:
- In the Custom HTML Widget, add the HTML for your icons:
- Click Save to apply the changes.
Here’s an example of how your social media icons might look:
| Platform | Icon Code |
|---|---|
INFO: Can I Use Tradelle Products With WordPress: A Complete Guide
Adding these icons will help increase engagement and provide easy access to your social media platforms. Use the steps above to make your footer more functional and attractive.
Customizing Footer Design
Editing the footer on your WordPress site allows you to add a personal touch and enhance user experience. Customizing the footer design can make your website look more professional and tailored to your brand. This guide will walk you through the steps to customize your footer design effectively.
Using Css For Styling
CSS (Cascading Style Sheets) is a powerful tool for styling your WordPress footer. By adding custom CSS, you can change colors, fonts, spacing, and more.
Here are some basic steps:
- Navigate to your WordPress dashboard.
- Go to Appearance > Customize.
- Click on Additional CSS.
- Add your custom CSS code.
For example, to change the background color of your footer, you can use:
footer {
    background-color: #333;
    color: #fff;
    padding: 20px;
}
Here are some other common CSS properties you might use:
- font-size: Change the size of the text.
- margin: Adjust the space around elements.
- padding: Adjust the space inside elements.
Using CSS allows you to have full control over the appearance of your footer. You can make it align with your site’s overall design.
Adjusting Layout With Widgets
Widgets are another great way to customize your footer. They allow you to add various elements like text, images, and links.
To add widgets:
- Go to your WordPress dashboard.
- Navigate to Appearance > Widgets.
- Find the Footer widget area.
- Drag and drop your desired widgets into the footer area.
Here are some useful widgets you can add:
- Text Widget: Add custom text or HTML.
- Image Widget: Display an image.
- Navigation Menu: Add a custom menu.
Using widgets makes it easy to add and arrange content in your footer. You can use multiple widgets to create a well-organized footer layout.
Widgets are user-friendly and don’t require any coding knowledge. They are perfect for adding extra information or functionality to your footer.
Utilizing Footer Plugins
Editing the footer on WordPress can be a daunting task for beginners. Utilizing footer plugins simplifies this process, providing a user-friendly interface and powerful customization options. These plugins allow you to add widgets, social media links, and custom text, enhancing your website’s appearance and functionality effortlessly.
Top Footer Plugins
Choosing the right footer plugin is crucial for seamless customization. Here are some of the top footer plugins for WordPress:
- Elementor: A versatile page builder that includes footer customization features.
- WPForms: Offers drag-and-drop form builder, perfect for adding contact forms to your footer.
- Footer Mega Grid Columns: Allows you to create a grid layout in your footer with multiple columns.
- Simple Custom CSS and JS: Enables adding custom CSS and JavaScript code to your footer.
Below is a table summarizing these plugins:
| Plugin | Features | Rating |
|---|---|---|
| Elementor | Drag-and-drop builder, footer templates | 4.8/5 |
| WPForms | Contact forms, easy integration | 4.9/5 |
| Footer Mega Grid Columns | Grid layout, multiple columns | 4.5/5 |
| Simple Custom CSS and JS | Custom code integration | 4.7/5 |
Installing And Configuring Plugins
Installing and configuring footer plugins in WordPress is straightforward. Follow these steps to get started:
- Log in to your WordPress dashboard.
- Navigate to the Plugins section and click on Add New.
- Use the search bar to find your desired plugin, such as Elementor.
- Click on Install Now and then Activate the plugin.
Once installed, configure the plugin settings:
- Go to the Appearance menu and select Customize.
- Find the Footer section and click on it.
- Use the plugin’s interface to add widgets, change layout, and customize styles.
- Click Publish to save your changes.
For plugins like WPForms, follow these additional steps:
- Create a new form using the drag-and-drop builder.
- Copy the shortcode provided after saving your form.
- Navigate to the Footer section in the customizer.
- Add a Text Widget and paste the shortcode.
These steps ensure a smooth installation and configuration process, allowing you to effortlessly customize your WordPress footer.

Previewing Changes
Editing the footer on WordPress can enhance the overall look and functionality of your website. It’s crucial to ensure that any changes made to the footer are displayed properly across all devices. Previewing changes allows you to see how the new footer design will look before it goes live. This step helps avoid any issues and ensures a seamless user experience.
Checking On Different Devices
It’s essential to preview your footer changes on various devices. This ensures that your website looks great on desktops, tablets, and smartphones. Responsive design is key to a successful website. Follow these steps to check your footer on different devices:
- Go to the WordPress Dashboard.
- Navigate to the Appearance section.
- Select Customize.
- Click on the Footer section.
- Make your desired changes.
- Click on the Preview button.
To preview on different devices:
- Use the responsive view in the WordPress Customizer.
- Click on the different device icons (desktop, tablet, mobile) to see how the footer looks.
- Ensure that all elements are aligned and readable.
- Check for any broken links or images.
Below is a table summarizing the key aspects to check:
| Device | Key Points to Check |
|---|---|
| Desktop | Alignment, font size, link functionality |
| Tablet | Responsive design, touch functionality, readability |
| Mobile | Load speed, touch navigation, legibility |
INFO: How to Make My Website Template WordPress: Step-by-Step Guide
Making Adjustments
After previewing, you may need to make adjustments to ensure the footer looks perfect. Here are the steps to follow:
- Return to the Customize section in your WordPress Dashboard.
- Navigate to the Footer settings.
- Make necessary changes, such as adjusting the font size or color.
- Use the Live Preview feature to see changes in real time.
- Check the footer on different devices again.
- Ensure that all elements are well-aligned and functional.
Common adjustments include:
- Changing font size to improve readability.
- Adjusting colors to match your brand.
- Repositioning elements for better alignment.
- Updating links to ensure they work properly.
Use the following tips for effective adjustments:
- Keep the design simple and clean.
- Ensure all text is legible.
- Use contrasting colors for better visibility.
- Test all links to ensure they are working.
Making these adjustments will help you create a footer that enhances your website’s appearance and functionality.
Saving And Publishing
Editing the footer on WordPress gives your site a polished look. It’s important to know how to save and publish these changes correctly. This guide will walk you through the steps to ensure your footer edits are finalized and live on your website.
Finalizing Edits
After making your desired changes in the footer, it’s crucial to finalize your edits. Double-check all elements to ensure they appear as expected. Follow these steps:
- Review Text: Ensure all text is correct and free of typos.
- Check Links: Verify that all hyperlinks are working and point to the correct destinations.
- Inspect Images: Make sure all images are displaying properly and are optimized for web use.
These checks are essential for maintaining a professional appearance. If you use custom HTML or CSS, ensure there are no errors. A small mistake can break the layout. Use the Preview feature to see how your changes look in real-time.
Here’s a quick checklist for finalizing edits:
| Task | Action |
|---|---|
| Text Review | Check for typos and formatting issues |
| Link Verification | Ensure all links work correctly |
| Image Inspection | Confirm images load and are optimized |
| HTML/CSS Check | Validate code for errors |
Publishing Changes
Once you’ve finalized your edits, the next step is publishing. Publishing makes your changes visible to your site visitors. Follow these steps to publish your changes:
- Save Draft: Before publishing, save your work as a draft. This allows you to review everything one last time.
- Preview: Use the preview function to see how your footer looks on different devices.
- Publish: Click the Publish button to make your changes live.
It’s also important to clear your site’s cache. This ensures your visitors see the latest version of your site. If you use a caching plugin, clear the cache after publishing. This step is often overlooked but is crucial for displaying your updates.
Here’s a brief summary of the publishing process:
| Step | Description |
|---|---|
| Save Draft | Save your changes as a draft for final review |
| Preview | Check how your footer looks on different devices |
| Publish | Make your changes live on your website |
| Clear Cache | Ensure visitors see the latest version of your site |
By following these steps, you ensure that your footer edits are correctly saved and published. This guarantees a professional and polished appearance for your website.

Troubleshooting Footer Issues
Editing the footer on WordPress can enhance your website’s appearance and functionality. Sometimes, you may face issues while editing the footer. This guide will help you troubleshoot common footer problems.
Common Problems
Several issues can arise when editing the footer on WordPress. Here are some common problems:
- Footer not displaying correctly: This happens when the footer content does not appear as intended.
- Links not working: Sometimes, links in the footer may not function properly.
- Formatting issues: The footer may have unexpected fonts, colors, or layout problems.
- Widgets not updating: Changes to footer widgets may not reflect immediately.
- Code conflicts: Custom code in the footer can cause errors.
| Problem | Possible Cause |
|---|---|
| Footer not displaying correctly | Theme settings or coding errors |
| Links not working | Incorrect URLs or broken links |
| Formatting issues | CSS conflicts or theme settings |
| Widgets not updating | Caching issues |
| Code conflicts | JavaScript or PHP errors |
Fixing Display Errors
To fix display errors in your WordPress footer, follow these steps:
- Check Theme Settings: Ensure the footer settings in your theme are configured correctly. Navigate to Appearance > Customize and review the footer options.
- Inspect Custom Code: If you have added custom code, verify that it is error-free. Use a code editor to check for syntax errors.
- Update Links: Ensure all URLs in the footer are correct. Update any broken links by editing the footer through Appearance > Widgets or the theme customizer.
- Clear Cache: Sometimes, browser or plugin cache can cause display issues. Clear your cache to see the latest changes.
- Check CSS: Look for CSS conflicts that might affect the footer. Use the browser’s developer tools to identify and resolve any CSS issues.
- Review Plugins: Deactivate plugins one by one to identify if any plugin is causing the issue. Reactivate the plugins once you find the culprit.
By following these steps, you can resolve most footer display errors on your WordPress site. Ensure you regularly update your theme and plugins to avoid future issues.
Frequently Asked Questions
How To Access The Footer In WordPress?
Go to Appearance > Customize > Footer. You can access and edit the footer from there.
Can I Edit Footer Without Coding?
Yes, most themes offer a customizable footer section in the WordPress Customizer.
How To Add Widgets To Footer?
Navigate to Appearance > Widgets. Drag and drop widgets into the footer widget areas.
How Do I Remove Footer Credits?
Use the Customizer or add custom CSS. Some themes also have options to remove or modify footer credits.
Conclusion
Editing the footer in WordPress is simple with the right steps. Follow our guide to customize it easily. Personalize your footer to enhance user experience and boost site credibility. Keep experimenting with different designs to find what works best for your audience.
Happy editing and improving your WordPress site!


