To change the font size in WordPress, use the theme customizer or a plugin like TinyMCE Advanced. Both methods are user-friendly.
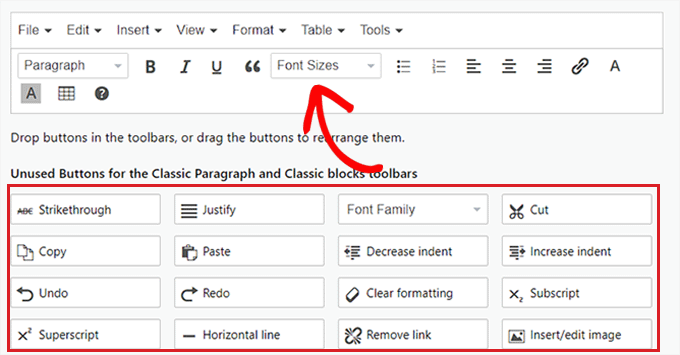
Font size plays a crucial role in website readability and user experience. Adjusting it in WordPress is simple and does not require coding skills. Using the theme customizer, you can access typography settings to modify font sizes. Alternatively, plugins like TinyMCE Advanced offer more control over text formatting.
These tools provide an intuitive interface, making it easy to enhance your site’s appearance. Proper font size improves accessibility and keeps visitors engaged. By following these steps, you ensure your content is both attractive and readable. This guide will help you achieve the perfect look for your WordPress site.

Using The WordPress Editor
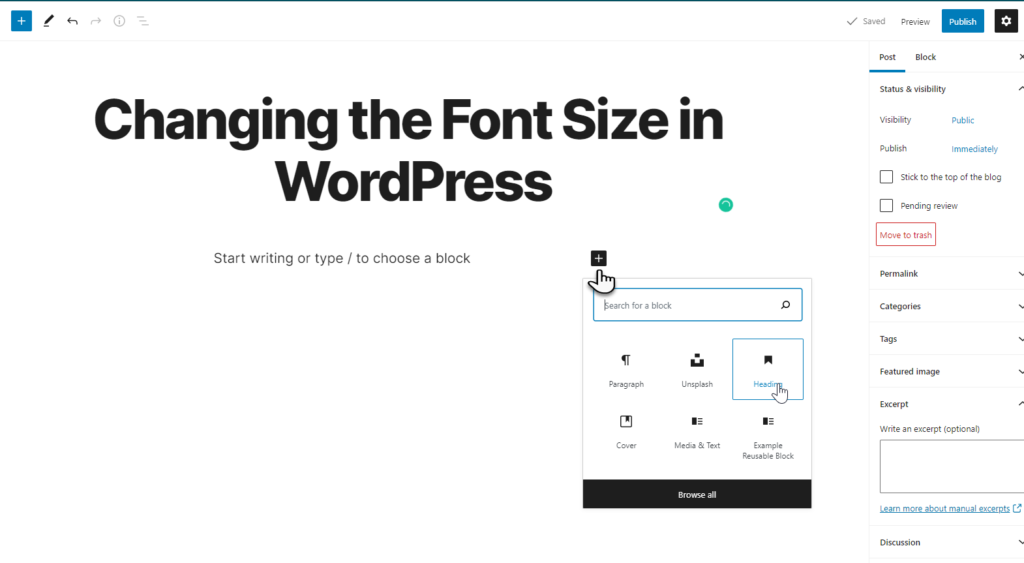
Changing font size in WordPress can make your site more readable. The WordPress Editor offers tools to adjust font size easily. Here, we’ll explore how to use the Gutenberg Editor and the Classic Editor for this task.
Gutenberg Editor
The Gutenberg Editor simplifies font size changes with a few steps:
- Open the page or post you want to edit.
- Select the block containing the text you wish to change.
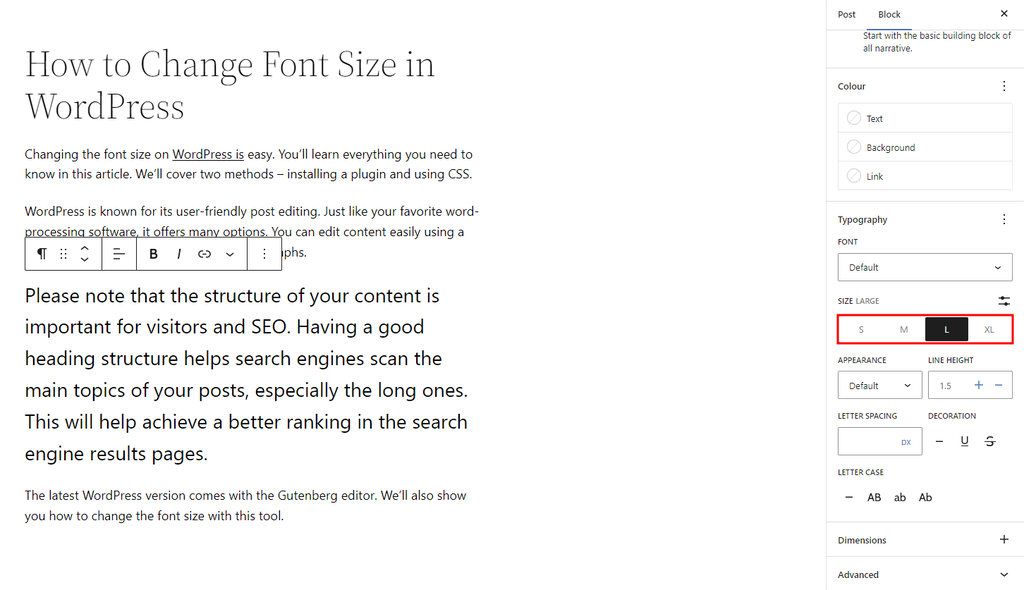
- In the right sidebar, find the Typography section.
- Use the Font Size dropdown to select a preset size.
- For custom sizes, click on Custom and enter your desired size in pixels.
The Gutenberg Editor also provides visual feedback. This helps you see changes instantly.
Classic Editor
The Classic Editor requires a different approach:
-
- Open the page or post you want to edit.
- Select the Text tab to switch to HTML view.
- Wrap your text in
tags with astyleattribute. For example:
Your text here
- Switch back to the Visual tab to see the changes.
The Classic Editor offers more control through HTML. This method requires basic HTML knowledge.
Both editors make changing font size easy, each in their own way. Choose the one that best fits your workflow.
Customizing With Theme Settings
WordPress themes offer built-in options for customizing font size. This makes changing your site’s font size simple. You don’t need coding skills. Just follow these steps to adjust your font size using theme settings.
Info: How to Clear Cache in WordPress Without Plugin: Quick Guide
Finding Theme Options
First, log in to your WordPress dashboard. Navigate to Appearance and then click on Customize. Here, you will find your theme’s customization options.
Look for a section labeled Typography or something similar. Each theme may have different labels. Some themes might hide typography settings under General Settings or Advanced Settings.
Adjusting Font Size
Once in the Typography section, you will see options to change the font size. You might find sliders, dropdown menus, or input fields to set the size. Adjust these to your liking. Some themes allow different settings for headings and body text.
To make your changes live, preview your site by clicking Save & Publish. Your site will now display the new font size.
| Step | Action |
|---|---|
| 1 | Log in to your WordPress dashboard |
| 2 | Navigate to Appearance > Customize |
| 3 | Find the Typography section |
| 4 | Adjust the font size settings |
| 5 | Click Save & Publish |
Info: How to Add Meta Tags in WordPress: A Step-by-Step Guide
By following these steps, changing the font size in WordPress becomes straightforward. Utilize your theme’s built-in options for a seamless experience.
Using Css For Font Changes
Changing the font size in WordPress can be simple with CSS. CSS allows you to control the style of your text with precision. This method provides flexibility and control over your website’s appearance.
Basics Of Css
CSS stands for Cascading Style Sheets. It is used to style HTML elements. In WordPress, you can use CSS to change the font size. Here’s a basic example:
p {
    font-size: 16px;
}
In this example, all paragraphs
will have a font size of 16 pixels. You can adjust the value to make the text larger or smaller.
Adding Custom Css
To add custom CSS in WordPress, follow these steps:
- Go to your WordPress Dashboard.
- Navigate to Appearance > Customize.
- Select the Additional CSS option.
- Enter your custom CSS code.
- Click Publish to save your changes.
For example, you can add the following code to change the font size of headings:
h1 {
    font-size: 32px;
}
h2 {
    font-size: 28px;
}
h3 {
    font-size: 24px;
}
This code sets different font sizes for
,
, and
tags. Adjust the pixel values to suit your design.
Using CSS provides precise control over your site’s typography. It ensures consistency and enhances the user experience.
Plugins For Font Customization
Using plugins to change the font size in WordPress is a simple solution. It provides flexibility and ease. Plugins offer a wide range of font customization options. This method is beginner-friendly and requires no coding skills.
Recommended Plugins
Here are some popular plugins for font customization:
| Plugin Name | Description |
|---|---|
| Easy Google Fonts | Integrates Google Fonts with your theme and provides customization options. |
| Use Any Font | Allows you to upload custom fonts and use them in your website. |
| WP Google Fonts | Enables you to add Google Fonts to your site easily. |
Info: How to Remove Noindex Tag in WordPress: Quick and Easy Steps
Installation And Setup
Follow these steps to install and set up a font customization plugin:
- Go to your WordPress dashboard.
- Navigate to Plugins > Add New.
- Search for the desired plugin, e.g., Easy Google Fonts.
- Click Install Now and then Activate.
- After activation, find the plugin settings in your dashboard.
- Configure the font options as per your requirements.
Using plugins for font customization in WordPress is straightforward. It enhances your site’s appearance. Choose the right plugin to match your needs.
Responsive Font Sizes
Responsive font sizes are essential for a great user experience. They ensure your text looks good on all devices. Learn how to make your font sizes adapt to different screen sizes.
Using Media Queries
Media queries allow you to apply CSS rules based on device characteristics. To change font sizes responsively, use media queries in your CSS file.
Here’s a simple example:
@media (max-width: 600px) {
  body {
    font-size: 14px;
  }
}

@media (min-width: 601px) and (max-width: 1200px) {
  body {
    font-size: 16px;
  }
}

@media (min-width: 1201px) {
  body {
    font-size: 18px;
  }
}
This code sets different font sizes for various screen widths. It ensures readability on all devices.
Best Practices
Follow these best practices for responsive font sizes:
- Use Relative Units: Use
emorreminstead ofpxfor flexibility. - Start with a Base Size: Set a base font size for the
bodyelement. - Test on Real Devices: Check how your text looks on various devices.
- Consider Accessibility: Ensure your text is readable for all users, including those with visual impairments.
Here’s a sample table for different font sizes:
| Device Type | Font Size |
|---|---|
| Mobile | 14px |
| Tablet | 16px |
| Desktop | 18px |
By following these tips, your WordPress site will have responsive font sizes. This ensures a better user experience for all visitors.

Troubleshooting Font Issues
Changing font size in WordPress can sometimes lead to issues. This section will help you troubleshoot common font problems with easy fixes.
Common Problems
- Font size not changing: CSS conflict or theme settings may prevent changes.
- Inconsistent font size: Multiple font settings may cause inconsistencies.
- Unresponsive fonts: Fonts may not scale well on different devices.
Quick Fixes
Use these quick fixes to solve your font issues:
- Check theme settings: Ensure your theme settings allow font changes. Navigate to
Appearance > Customize > Typographyto adjust font sizes. - Inspect CSS: Look for conflicting CSS rules. Use the browser’s developer tools to inspect elements and find conflicting styles. Add custom CSS if needed.
- Install a plugin: Plugins like Easy Google Fonts or WP Typography can help manage fonts. Install and configure the plugin to override default settings.
If you still face issues, consider switching to a different theme. Testing with another theme can help identify if the problem is theme-specific.
Final Thoughts
Changing the font size in WordPress can greatly enhance your website’s readability. Using the right methods ensures your content is accessible and visually appealing.
Summary Of Methods
Here is a quick summary of the methods you can use to change font size in WordPress:
| Method | Details |
|---|---|
| Using the Theme Customizer | Accessible from the Appearance menu. Customize font size site-wide. |
| Using Plugins | Install plugins like TinyMCE Advanced for more control. |
| Custom CSS | Add custom CSS in the Additional CSS section. Ideal for specific changes. |
Info: How to Speed Up Your WordPress Website: 10 Proven Techniques
Additional Resources
For more detailed guidance, check out the following resources:
These resources offer step-by-step guides and community support.

Frequently Asked Questions
How To Change Font Size In WordPress?
Navigate to Appearance > Customize > Additional CSS. Add CSS code to adjust font size.
Can I Use Plugins For Font Size Change?
Yes, plugins like TinyMCE Advanced or Easy Google Fonts allow you to change font size easily.
What Css Code Changes Font Size?
Use `font-size: 20px;` in your CSS to change font size. Adjust the value as needed.
Conclusion
Changing the font size in WordPress is simple and enhances your site’s readability. Follow the steps outlined to customize your text effectively. Regularly updating your font size can improve user experience and keep your website looking fresh. Start experimenting with different font sizes today to see what works best for your audience.


