
To change a WordPress font, navigate to the Appearance section in your dashboard and select Customize. From there, access the Typography settings.
Changing fonts in WordPress can enhance your site’s visual appeal and improve readability. Different fonts can convey various moods and styles, making it crucial to select the right one. WordPress makes it easy to switch fonts through its user-friendly interface.
Whether you want a modern, professional look or a playful, creative vibe, adjusting your site’s typography can make a significant difference. With just a few clicks, you can experiment with different fonts and see the changes in real-time. This guide will walk you through the process, ensuring you can effortlessly update your site’s font to match your brand’s aesthetic.
Preparing For Font Change
Before you change your WordPress font, you need to prepare. This ensures a smooth transition. Proper preparation prevents mistakes and keeps your site safe. Follow these steps to get ready for a font change.
Backup Your Site
The first step is to backup your site. This protects your data. If something goes wrong, you can restore your site. Many plugins help with backups. Use one that suits your needs.
- Install a backup plugin.
- Run a full backup of your site.
- Save the backup file in a safe place.
Choose The Right Font
Next, you need to choose the right font. The font should match your site’s style. It should also be easy to read. Here are some tips for choosing a font:
- Consider your site’s purpose.
- Look at the readability of the font.
- Check the font’s compatibility with your theme.
Many fonts are available online. Google Fonts is a popular choice. It offers a wide range of free fonts. Pick a font that enhances your site’s look.
Using WordPress Theme Customizer
Changing fonts in WordPress can seem tricky. But the WordPress Theme Customizer makes it easy. Follow these steps to transform your site’s typography without coding. The Customizer is user-friendly and powerful.
Accessing The Customizer
First, log into your WordPress dashboard. From the left-hand menu, click on Appearance, then select Customize. This will open the Theme Customizer.
In the Customizer, you’ll see various options. These options allow you to adjust different parts of your theme. Look for the section labeled Typography or Fonts. Click on it to proceed.
Changing Font Settings
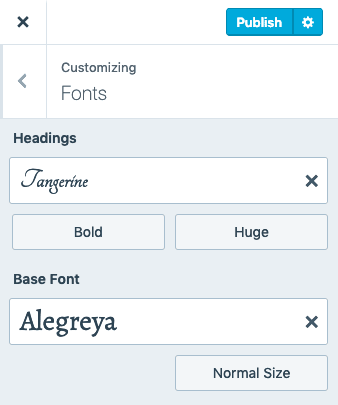
Once in the Typography or Fonts section, you will see different font settings. Here, you can adjust the font for headings, body text, and more.
| Option | Purpose |
|---|---|
| Font Family | Choose the type of font. |
| Font Size | Set the size of the font. |
| Font Color | Change the color of the text. |
Info: What is Group Block in Gutenberg WordPress: Ultimate Guide
To change the font family, click on the Font Family dropdown. A list of available fonts will appear. Choose the one you like. You will see the changes instantly in the preview area.
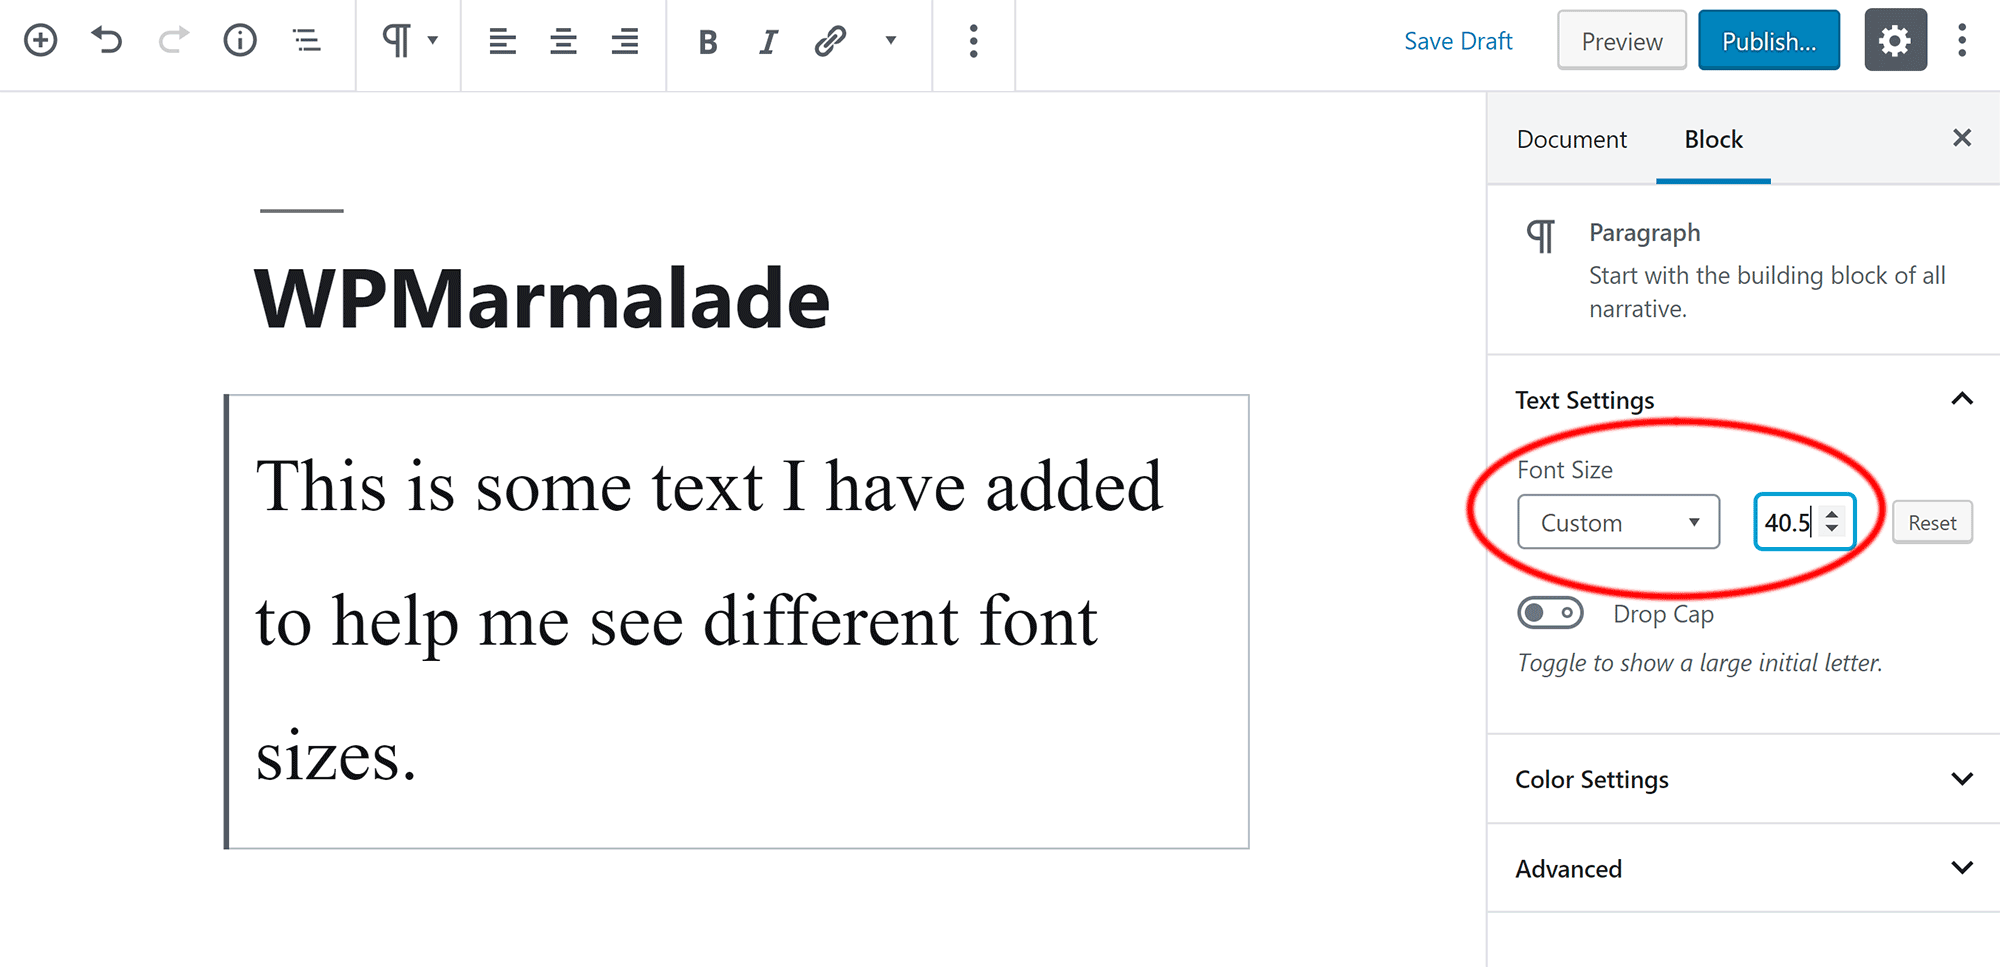
Next, adjust the font size. Use the Font Size slider or input box. Move the slider to increase or decrease the size. Again, you will see the changes in real-time.
Finally, modify the font color. Click on the Font Color option. A color picker will appear. Choose your desired color. Watch as your text changes color in the preview.
After making all your changes, click the Publish button at the top. This will save your new font settings and apply them to your site.
Installing A Font Plugin
Changing the font on your WordPress site can give it a fresh look. One of the easiest ways to change fonts is by installing a font plugin. This method is user-friendly and does not require coding skills.
Top Font Plugins
Choosing the right font plugin can be overwhelming. Here is a table of the top font plugins to help you decide:
| Plugin Name | Features | Ratings |
|---|---|---|
| Easy Google Fonts | Integrates with Customizer, 600+ Google Fonts | 4.5/5 |
| Use Any Font | Upload custom fonts, Supports all browsers | 4.4/5 |
| WP Google Fonts | Easy setup, Multiple fonts in one site | 4.2/5 |
Info: How to Share a PDF on WordPress With Email: Quick Guide
Step-by-step Installation
Follow these simple steps to install a font plugin:
- Log in to your WordPress Dashboard.
- Navigate to Plugins and click Add New.
- In the search bar, type the name of the plugin you want.
- Click Install Now next to your chosen plugin.
- After installation, click Activate.
Your plugin is now ready to use. You can find it in the Appearance or Settings menu. From there, you can customize your site’s fonts.
Adding Custom Fonts
Changing the font on your WordPress site can make it unique. By adding custom fonts, you can give your site a personal touch. This guide will show you how to add custom fonts using two methods. These methods are Using Google Fonts and Uploading Your Own Fonts. Let’s dive in and see how you can do this.
Using Google Fonts
Google Fonts offers many free fonts. You can easily integrate them into your WordPress site. Follow these steps to use Google Fonts:
- Go to the Google Fonts website.
- Pick a font you like.
- Click on the font and select the styles you want.
- Copy the provided tag.
- Go to your WordPress dashboard.
- Navigate to Appearance > Theme Editor.
- Paste the tag in the section of your
header.phpfile. - Add the following CSS to use the font:
body {
  font-family: 'Your chosen font name', sans-serif;
}
Uploading Your Own Fonts
If you have a specific font file, you can upload it to your WordPress site. Follow these steps to upload your own fonts:
- First, prepare your font file in formats like
.woff,.woff2,.ttf, or.otf. - Go to your WordPress dashboard.
- Navigate to Appearance > Theme Editor.
- Find the
style.cssfile of your theme. - Upload your font files to your theme’s
fontsdirectory. - Add the following CSS to your
style.cssfile:@font-face {
font-family: 'Your Custom Font';
src: url('fonts/your-font-file.woff2') format('woff2'),
url('fonts/your-font-file.woff') format('woff');
}
body {
font-family: 'Your Custom Font', sans-serif;
}
By following these steps, you can easily add custom fonts to your WordPress site.
Editing Css For Font Changes
Changing fonts in WordPress can enhance your site’s appearance. Editing CSS for font changes offers flexibility and control. Follow these steps to update your site’s typography.
Accessing The Css Editor
First, access the CSS editor in WordPress. Navigate to your dashboard. Click on Appearance > Customize. In the customizer, find the Additional CSS section. Here, you can add custom CSS code. This area allows you to modify the site’s styles.
Css Code Examples
Below are some CSS code examples to change fonts:
- Change body font:
body { font-family: 'Arial', sans-serif; } - Change heading fonts:
h1, h2, h3, h4, h5, h6 { font-family: 'Georgia', serif; } - Change specific class font:
.custom-class { font-family: 'Verdana', sans-serif; }
Use these examples to start customizing your fonts. Remember to save changes after editing the CSS.
Testing And Troubleshooting
After changing your WordPress font, testing and troubleshooting are crucial. This ensures your website looks perfect on all devices. Let’s dive into the steps to test and troubleshoot font changes.
Previewing Changes
Before finalizing, always preview your changes. Use the built-in WordPress Customizer for this purpose.
Follow these steps:
- Go to Appearance > Customize.
- Navigate to the Typography section.
- Make your font changes and click Preview.
This allows you to see how the new font looks across your site. Ensure it appears correctly on different pages and devices.
Common Issues And Fixes
Sometimes, fonts may not appear as expected. Here’s a table of common issues and their fixes:
| Issue | Fix |
|---|---|
| Font not loading | Check if the font file is correctly linked. |
| Font size too small/large | Adjust the font size in the Typography settings. |
| Font not responsive | Ensure your theme supports responsive typography. |
Info: How to Change the Product Page Tabs Titles in WordPress: Quick Guide
If these fixes don’t work, consider these additional steps:
- Clear your browser cache.
- Deactivate conflicting plugins.
- Check for theme updates.
By following these steps, you can ensure your new font looks perfect. Happy customizing!
Final Touches
After changing your WordPress font, the final touches are crucial. These ensure your site runs smoothly and looks great across all devices. Let’s dive into the final steps to perfect your WordPress font change.
Optimizing For Performance
Optimizing your website’s performance is essential. This ensures fast load times and a better user experience. Here’s how you can do it:
- Minimize HTTP Requests: Use fewer font files. Combine CSS files to reduce server requests.
- Use Web Fonts Wisely: Choose only the necessary font weights and styles.
- Implement Caching: Use a caching plugin. This stores static versions of your site.
Ensuring Cross-browser Compatibility
Ensuring your new font works across all browsers is key. Different browsers can render fonts differently. Follow these steps:
- Test on Major Browsers: Check your site on Chrome, Firefox, Safari, and Edge.
- Use Web-Safe Fonts: Consider using fonts that are widely supported.
- Include Fallback Fonts: Add a fallback font in your CSS code.
Here’s an example of adding fallback fonts:
body {
  font-family: 'Open Sans', Arial, sans-serif;
}
In this example, if ‘Open Sans’ fails, the browser will use Arial. If Arial fails, it will use a generic sans-serif font.
Follow these steps to ensure your WordPress font change is flawless. Your site will be fast, functional, and visually appealing.
Info: How to Add Video Background in WordPress in HTML: Step-by-Step Guide
Frequently Asked Questions
How Do I Change Fonts In WordPress?
Go to the Appearance tab, select Customize, and then choose Fonts. Adjust settings to your preference.
Can I Use Custom Fonts In WordPress?
Yes, upload custom fonts via plugins like Use Any Font or manually through your theme’s CSS file.
Which Plugin Is Best For Changing Fonts?
Use Any Font and Easy Google Fonts are popular plugins for managing fonts easily in WordPress.
Does Changing Fonts Affect Website Speed?
Yes, using multiple or large custom fonts can slow down your website. Optimize font loading for better performance.
Conclusion
Changing fonts in WordPress is simple and enhances your site’s appearance. Follow the steps provided to customize effortlessly. Experiment with different fonts to find the perfect match for your brand. Enjoy a unique and engaging site that stands out. Keep your readers engaged with appealing typography.
Happy customizing!