To unpublish a WordPress site, go to the “Settings” section and select “Reading.” Then, choose the “Discourage search engines from indexing this site” option.
Unpublishing a WordPress site is essential when you need to make it temporarily inaccessible to the public. This step ensures that your content is hidden from search engines and visitors while you make necessary updates or changes. By discouraging search engines from indexing your site, you can maintain your site’s privacy without deleting any content.
This approach is beneficial for site maintenance, redesigns, or troubleshooting issues. Implementing this simple yet effective method allows you to control your site’s visibility, ensuring it meets your standards before going live again.
Preparation
Before you unpublish your WordPress site, thorough preparation is crucial. This ensures a smooth transition and avoids potential issues. Let’s delve into the essential steps.
Backup Your Site
Creating a backup is a vital step. It protects your data from loss. Follow these steps to backup your site:
- Go to your WordPress dashboard.
- Navigate to Tools > Export.
- Select All content and click Download Export File.
Using a plugin can simplify the process:
- Install a plugin like UpdraftPlus or BackupBuddy.
- Follow the plugin’s instructions to create a backup.
Inform Users
Informing your users is considerate and maintains trust. Use these methods:
| Method | Description |
|---|---|
| Send a clear email to your subscribers. | |
| Blog Post | Write a post explaining the unpublishing. |
| Social Media | Announce on your social platforms. |
Info: How to Remove Noindex Tag in WordPress: Quick and Easy Steps
Here’s a sample email template:
Subject: Upcoming Changes to Our Website

Dear [User],

We wanted to inform you about an important update. We will be unpublishing our site on [Date].

Thank you for your understanding.

Best regards,
[Your Name]
Using Built-in WordPress Options
Unpublishing your WordPress site is easy with built-in options. These options are user-friendly and effective. Let’s explore two primary methods: Privacy Settings and Maintenance Mode.
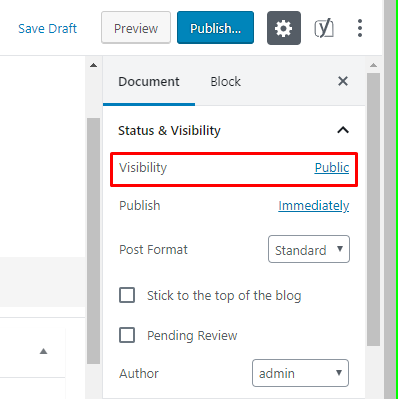
Privacy Settings
Privacy settings are an excellent way to control your site’s visibility. You can make your site private with a few simple steps.
- Log in to your WordPress dashboard.
- Go to Settings > Reading.
- Find the Site Visibility section.
- Select Discourage search engines from indexing this site.
This setting informs search engines not to index your site. It’s a quick way to reduce visibility. For complete privacy, you can make your site accessible to only logged-in users.
- Navigate to Settings > Privacy.
- Choose Private and save changes.
Now, only logged-in users can view your content. This option is great for internal projects or personal sites.
Info: How to Edit Footer in WordPress: Step-by-Step Guide
Maintenance Mode
Maintenance Mode is useful for temporary unpublishing. It allows you to display a maintenance message to visitors.
You can enable Maintenance Mode using a plugin. Popular plugins include WP Maintenance Mode and SeedProd.
- Install and activate your chosen plugin.
- Go to the plugin’s settings page.
- Enable Maintenance Mode.
- Customize the maintenance message if needed.
Visitors will now see a maintenance message. This method is perfect for site updates or redesigns.
Here’s a comparison of the two methods:
| Method | Best For | Steps |
|---|---|---|
| Privacy Settings | Long-term unpublishing | Settings > Reading > Site Visibility |
| Maintenance Mode | Temporary unpublishing | Install plugin > Enable mode |
Info: How to Speed Up Your WordPress Website: 10 Proven Techniques
Both methods are easy and effective. Choose the one that best fits your needs.
Plugins For Unpublishing
Sometimes, you might need to unpublish your WordPress site temporarily. This can be due to maintenance, redesign, or other reasons. Plugins make this task straightforward and efficient. They offer various features to help you unpublish with ease.
Popular Plugins
There are several popular plugins that help unpublish a WordPress site. Here are a few:
- Maintenance Mode: This plugin puts your site in maintenance mode.
- Coming Soon Page & Maintenance Mode by SeedProd: This plugin offers customization options.
- WP Maintenance Mode: This is another robust plugin for unpublishing.
Plugin Setup
Setting up these plugins is simple. Follow these steps to get started:
- Go to your WordPress dashboard.
- Navigate to Plugins > Add New.
- Search for the desired plugin (e.g., Maintenance Mode).
- Click Install Now and then Activate.
- Configure the plugin settings as per your needs.
| Plugin | Main Feature | Ease of Use |
|---|---|---|
| Maintenance Mode | Puts site in maintenance mode | Easy |
| SeedProd | Customization options | Moderate |
| WP Maintenance Mode | Robust unpublishing features | Easy |
Info: How to Limit Audio Plays in WordPress: Easy Step-by-Step Guide
Using these plugins, you can unpublish your WordPress site efficiently. They offer various features to match your specific needs.
Manual Methods
Unpublishing a WordPress site can be essential for various reasons. Whether it’s for maintenance, redesign, or security, manual methods provide control. This guide will cover editing the .htaccess file and creating a custom maintenance page.
Editing .htaccess File
The .htaccess file can restrict access to your website. This method is effective and straightforward.
Here’s a step-by-step guide:
- Access your website’s root directory via FTP or cPanel.
- Locate the .htaccess file. If it doesn’t exist, create one.
- Open the file using a text editor.
- Add the following code:
Order deny,allow
Deny from all
Allow from YOUR_IP_ADDRESS
Replace YOUR_IP_ADDRESS with your actual IP address. Save the file and upload it back to the server.
This code will block access to everyone except you. It ensures the site is unpublished for visitors.
Custom Maintenance Page
Creating a custom maintenance page is another effective method. This informs visitors that your site is temporarily unavailable.
Follow these steps:
- Create an HTML file named maintenance.html.
- Add a message like:
We'll be back soon!Our website is currently under maintenance.Save this file in your website’s root directory. Next, edit your .htaccess file again.
Add the following code:
RewriteEngine On
RewriteCond %{REQUEST_URI} !/maintenance.html$
RewriteCond %{REMOTE_ADDR} !^YOUR_IP_ADDRESS$
RewriteRule ^(.)$ /maintenance.html [R=302,L]
Replace YOUR_IP_ADDRESS with your IP address. This code will redirect all users to the maintenance page.
By using these manual methods, you can successfully unpublish your WordPress site.
Testing The Unpublished Site
After you unpublish your WordPress site, you must test it. This ensures that it is truly inaccessible to the public. Checking user access and views on different devices is essential. Below, we will guide you on how to perform these checks.
Check User Access
First, verify that no users can access your unpublished site. Follow these steps:
- Open an Incognito or Private browser window.
- Navigate to your site URL.
- Ensure you see a maintenance or coming soon page.
- If you see your site, double-check your unpublish settings.
Additionally, ask a friend to test the access. This ensures your site is inaccessible from different networks.
Mobile And Desktop Views
Next, check how your unpublished site appears on both mobile and desktop devices. Here’s how:
| Device | Action |
|---|---|
| Desktop | Open your site URL in a desktop browser. |
| Mobile | Open your site URL in a mobile browser. |
Info: How to Change a WordPress Font: Step-by-Step Guide
Check for any differences in the display. Ensure the unpublished message or page is consistent across devices.
Use browser tools to switch between mobile and desktop views. This helps in identifying any display issues.
By following these steps, you confirm that your unpublished WordPress site is secure and inaccessible to the public.
Re-publishing Your Site
After you’ve made changes to your WordPress site, you may want to re-publish it. This process can be simple if you follow the right steps. Below, we explain how to do this effectively.
Reversing Changes
To re-publish your site, start by reversing any changes you made. This could include:
- Enabling plugins that were disabled
- Switching back to your original theme
- Restoring any removed pages or posts
Make sure everything is back to how it was before unpublishing.
Notifying Users
Once your site is ready, it’s important to notify your users. This helps them know your site is live again. You can do this by:
- Sending an email to your subscriber list
- Posting an update on social media
- Adding a notification banner on your homepage
Clear communication ensures your users stay informed.
Frequently Asked Questions
How Do I Unpublish My WordPress Site?
Go to the WordPress dashboard, select “Settings,” then “Reading,” and choose “Discourage search engines from indexing this site. “
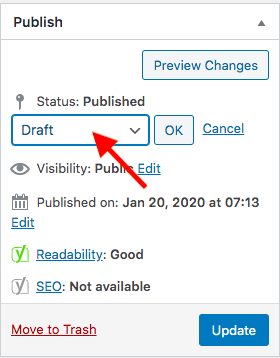
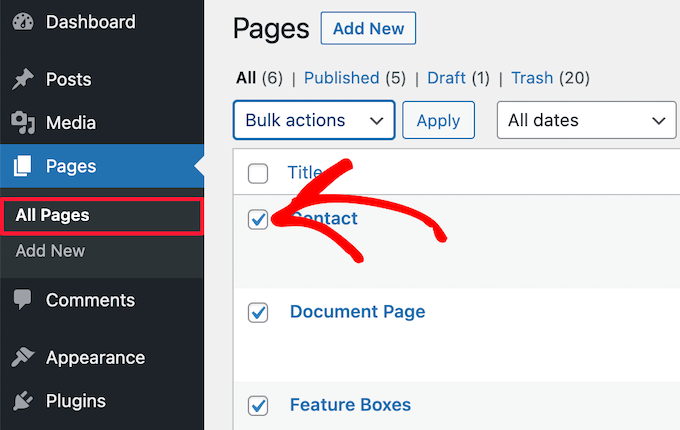
Can I Unpublish A Single Page?
Yes, edit the page, change its status to “Draft,” and update to unpublish.
Is There A Plugin To Unpublish?
Yes, plugins like “Maintenance Mode” or “Coming Soon Page” can help unpublish your site temporarily.
Will Unpublishing Affect My Seo?
Unpublishing can affect SEO as search engines will no longer index your site.
Conclusion
Unpublishing your WordPress site is simple with the right steps. Follow our guide to ensure a smooth process. This helps maintain your site’s privacy and control. Stay informed and manage your WordPress site effectively. For more tips and tricks, explore our other WordPress tutorials.