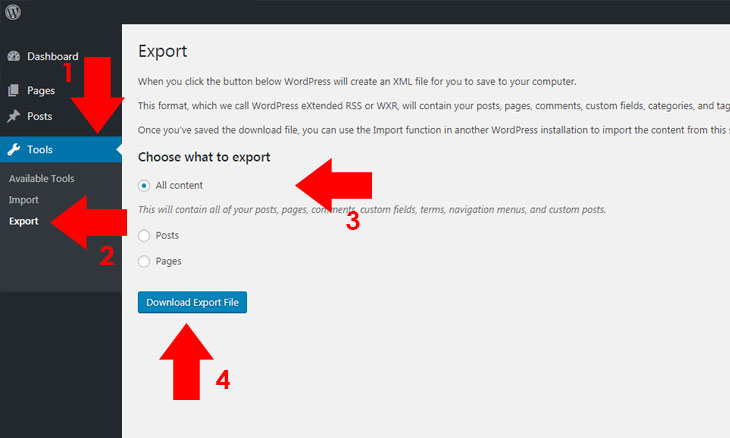
To add an .xml file to WordPress, navigate to the “Tools” section and select “Import.” Choose the appropriate importer and upload your .xml file.
WordPress simplifies the process of importing various file formats, including. xml files. This feature is especially useful for transferring content between different WordPress sites or importing data from other platforms. Whether you’re moving posts, pages, or entire databases, WordPress’s built-in import tool makes the task straightforward.
By accessing the “Tools” section from the dashboard, users can easily upload and incorporate. xml files into their existing WordPress framework. This ensures a seamless integration of new data, enhancing the site’s functionality and user experience. The import tool is essential for anyone looking to efficiently manage their website’s content.
Prerequisites
Adding an .xml file to WordPress is a straightforward task. Before diving in, there are a few prerequisites to consider. Ensuring these prerequisites are met will make the process smooth and efficient.
Basic Knowledge
Before adding an .xml file, you should have some basic knowledge:
- Understanding of WordPress Dashboard
- Familiarity with File Uploads in WordPress
- Basic knowledge of XML files
Knowing these basics will help in avoiding mistakes. It will also make the process faster.
Required Tools
Ensure you have the following tools ready:
| Tool | Description |
| WordPress Login | Access to your WordPress admin area |
| XML File | Your .xml file ready for upload |
| FTP Client | Optional, for advanced file management |
With these tools, you can easily upload and manage your .xml file.
Info: How Do You Manually Overwrite the Robots.Txt File in WordPress: A Step-by-Step Guide
Access WordPress Dashboard
Adding an XML file to WordPress starts with accessing the dashboard. The dashboard is the control panel for your WordPress site. Here, you can manage settings, posts, and plugins. Follow these steps to get started:
Login Steps
- Open your web browser.
- Type yourwebsite.com/wp-admin in the address bar.
- Enter your username and password.
- Click the Login button.
Once you log in, you will see the WordPress dashboard. This is your main control center.
Navigating The Dashboard
The dashboard has a main menu on the left side. Here are some key sections:
- Posts: Create and manage your blog posts.
- Media: Upload and manage images and files.
- Pages: Create and manage static pages.
- Appearance: Customize your site’s look.
- Plugins: Add and manage plugins for extra features.
- Settings: Adjust your site’s core settings.
To add an XML file, you will often use the Media section. Sometimes, you might need a plugin. Each task is just a few clicks away in the dashboard.
Locate Import Tool
Adding an .xml file to WordPress can seem daunting. But it’s straightforward once you know where to look. This guide will help you locate the import tool in WordPress.
Finding The Tool
First, log in to your WordPress dashboard. The dashboard is your main control panel. Look at the left-hand menu. Scroll down until you find the Tools section.
Under Tools, you’ll see several options. Click on the one labeled Import. This is where you’ll find the import tool. It’s used for importing various types of content.
Accessing The Import Feature
Once you’re in the Import section, you’ll see a list of import options. Look for the WordPress option. This is the tool you need to import an .xml file.
Click on Install Now under the WordPress option. After the installation, the button will change to Run Importer. Click on this button to access the import feature.
Now, you can upload your .xml file and add it to your site. Follow the on-screen instructions to complete the import process.
Install Importer Plugin
To add an .xml file to WordPress, you need an Importer Plugin. This plugin allows you to import data efficiently. Follow these steps to install it.
Selecting The Plugin
First, go to your WordPress dashboard. Hover over Plugins and click Add New.
In the search bar, type WordPress Importer. Look for the plugin by WordPress.org.
Check the ratings and reviews. Ensure it is compatible with your WordPress version. Once satisfied, proceed to install.
Installation Process
Click the Install Now button next to the plugin. Wait a few seconds for it to install.
Once installed, the button will change to Activate. Click it to activate the plugin.
After activation, you will see the plugin in your list of active plugins. You can now import your .xml file.
Upload Xml File
Uploading an XML file to WordPress is simple. Follow these steps to add your XML file.
Choose File Option
First, log in to your WordPress dashboard. Navigate to the Tools menu on the left sidebar. Click on Import. You will see several options for importing files.
Scroll down and find the WordPress option. Click on Install Now if it’s not already installed. Once installed, click Run Importer.
Uploading Steps
Now you are ready to upload your XML file. Follow these steps:
- Click on the Choose File button.
- Select the XML file from your computer.
- Click on the Upload file and import button.
After uploading, you will be asked to assign authors. Choose an existing user or create a new one. Then click Submit.
Your XML file will start importing. Once completed, you will see a success message.
| Step | Action |
| 1 | Navigate to Tools > Import |
| 2 | Select WordPress and run importer |
| 3 | Choose File and upload |
| 4 | Assign authors and submit |
That’s it! Your XML file is now uploaded and imported into WordPress. Check your content to ensure everything is in place.
Info: Do WordPress Tags Boost Your Social Media Engagement
Map Content
Adding an .xml file to WordPress is essential for content migration. Mapping content ensures the correct assignment of authors and posts. This helps in maintaining the structure and integrity of your website.
Match Authors
Matching authors is crucial. It ensures that each post retains its original author.
Follow these steps to match authors:
- Navigate to the Import section in WordPress.
- Upload your .xml file.
- During the import process, you will see an option to match authors.
- Select the authors from the drop-down menu.
Matching authors helps in keeping the credibility and authenticity of the posts. It also ensures that the original writer gets proper credit.
Assign Content
Assigning content is the next step after matching authors. It involves designating posts, pages, and other content to the correct sections.
Here is how you can assign content:
- Choose the content type (posts, pages, etc.) during the import.
- Select the appropriate category or tag for each piece of content.
- Ensure that the media files (images, videos) are correctly linked.
Assigning content properly maintains your site’s structure. It also makes navigation easier for users.
Following these steps will help in a smooth content migration. Your website’s structure and credibility will remain intact.
Verify Import
Once you’ve uploaded your .xml file to WordPress, it’s crucial to verify the import. This ensures all your data has transferred correctly. Follow these steps to check and fix any issues.
Check Content
First, navigate to your WordPress dashboard. Check your posts, pages, and media library. Verify that all your content has been imported.
- Go to Posts and see if all your articles are there.
- Check the Pages section to ensure all pages are present.
- Visit the Media Library to confirm all images and files have been imported.
If you notice missing content, make a note of it. You’ll need this information in the next step.
Fix Common Issues
Sometimes, not all content imports smoothly. Here’s a list of common issues and how to fix them:
| Issue | Solution |
| Missing Posts | Re-upload the .xml file and re-import. |
| Broken Images | Manually upload images to the media library. |
| Incorrect Formatting | Edit the posts and pages manually to fix formatting. |
Info: How Many Tables in a Default WordPress: Uncover the Hidden Structure
Follow these steps to fix any issues you encounter. This ensures your website functions correctly.

Frequently Asked Questions
How To Upload An Xml File To WordPress?
Navigate to your WordPress Dashboard, go to Tools > Import, and select your XML file to upload.
Can I Import Xml Files Directly In WordPress?
Yes, use the WordPress importer tool found under Tools > Import to directly import XML files.
Why Import Xml Files In WordPress?
XML files help migrate content, settings, and configurations between WordPress sites, simplifying the setup process.
What Plugins Support Xml File Imports?
Plugins like “WordPress Importer” and “All-in-One WP Migration” support importing XML files efficiently.
Conclusion
Adding an. xml file to WordPress is straightforward. Follow the steps outlined to ensure a smooth process. This enhances your site’s functionality and SEO performance. With a well-structured. xml file, your website can better communicate with search engines. Keep your site updated for optimal results.
Happy blogging!